

In the last Journal I attempted to demonstrate how programming in REALbasic (RB) can be fun and interesting while at the same time being reasonably simple to do. This article will begin a journey through the construction of a full-featured check register. If I have piqued your interest with programming in RB, I encourage you to download a trial copy of the application and follow along. A demo copy of RB can be downloaded here:
The demo copy will allow you to work with the application we are building and see how simple it is to construct your own application. As we proceed the compiled application and source code for each issue will be posted on the Pi Web site so you can download it and run the application as it is developed.
We begin by starting a new project in RB, defining some parameters in the new window and adding four controls to the window. The controls are added by simply dragging them from the list on the left into our new window. Figure 1 shows RB's Integrated Design Environment or IDE, with the controls installed. The controls are four PushButtons and a ListBox. The PushButtons are familiar Macintosh objects and the ListBox can be thought of as a grid (like a spreadsheet) in which we manage the number of columns and rows. The ListBox will be our check register and each transaction will add a new row to the contents of ListBox.
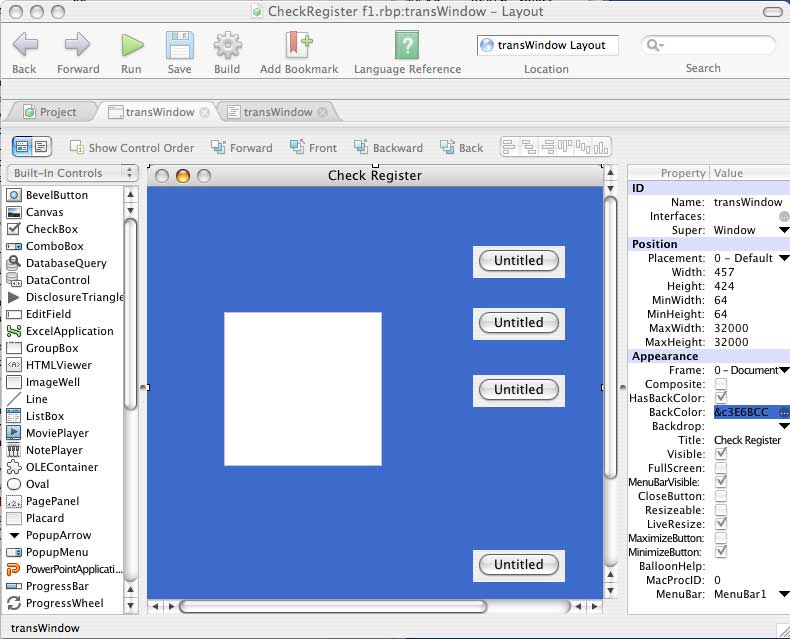
Figure 1: The beginning of the Check Register window
As you may recall from the last article, the right column is where one defines the values for the various properties of the window or control that is selected at the time. In this case I have defined some of the values that govern what the window looks like and how it is controlled by both the program and by the user.
The significant parameters are as follows: Name is transWindow (as in Transaction Window). This name, which cannot have spaces, is the name the code will use to point to the window. Think of it as the window's address. HasBackColor is checked so that I can apply a color to the window and just below that, BackColor is where the specific color is selected by clicking on the small circle containing an ellipsis that brings up the standard Mac color wheel. Although it isn't apparent in the black & white Journal, I've made the window blue. Title is the window title, which the user sees in the Title Bar: "Check Register." I have deselected CloseButton because this is the main program window and I don't want the user to inadvertently close the window. I have also deselected Resizable so the user can't resize the window. If resizing were allowed the user might shrink the window and hide some of the controls.
To finish the transWindow construction, I've dragged in a StaticText control from the left window and duplicated it five times to make the ListBox column headings as follows:
Date Check Nr Payee/Payer Debit Credit Balance
The next step is to define the controls that have been added. Figure 2 is the right side of the IDE showing the PushButtons with captions added and the Property/Value table for the checkButton that is selected (note the frame around "Write Check"). Note the Name (again think of this as the button's address), Position (Left, Top, Width & Height), Caption and Font entries. The button is Enabled and is Visible. As you can see, there is a Default property. This would be checked if we wanted to make any one of these buttons the default; that is, the one which would appear in Aqua and activate by hitting the Return key.
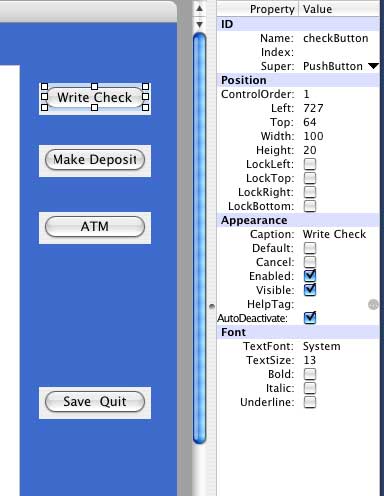
Figure 2: The Property/Value table for checkButton
Lastly, the ListBox parameters are defined; see the Property/Value table in Figure 3. The Name is transList. ColumnCount is set to 7; the ColumnWidths are defined as 0, 70, 55, 250, 80, 80, 100. Almost everything in RB is numbered beginning with zero so these widths define columns 0 through 6. Column 0 will be used to store the date in TotalSeconds, the number of seconds since 12:00AM, January 1, 1904, so I've made it invisible by making the column width zero. The remaining column widths are directly associated with the column headings above: Date = 70, Check Nr = 55, etc.
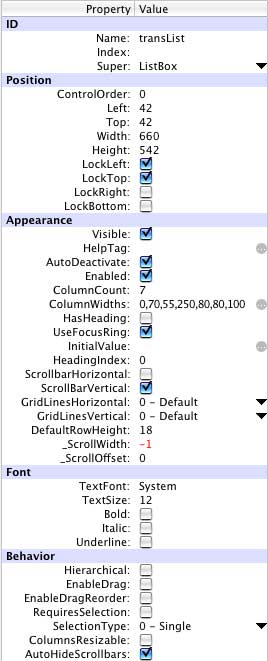
Figure 3: The Property/Value table for transList
Now that the window and its controls have been defined, it's time to write the code that will make the window work. Look again at Figure 1 just above the popup menu labeled "Built-In Controls" is an icon showing two figures. The left one selects the graphical view of the window; the right selects the coding portion of the window. Pressing the right side opens the code portion and inserts an additional tab in the IDE for quick selection of graphics or code in the window under construction. Note the three tabs: Project, transWindow (graphics) and transWindow (code).
Figure 4 shows a portion of the transWindow code tab revealing the controls we have installed. Clicking each control's disclosure triangle reveals its event handlers as well as the event handlers for the window itself. These event handlers vary with the control; for example the three buttons have such handlers as: Action, Open, Close, Mouse Down, Mouse Up, Mouse Enter, Mouse Exit. The listBox (transList) has, among others: CellClick, CellTextPaint, Change, DoubleClick, as well many of the same handlers as the buttons.
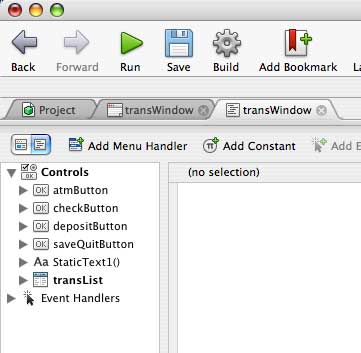
Figure 4: The coding window showing the list of controls.
The first thing to accomplish is formatting transList. That is accomplished in the transList Open event handler as follows:
me.ColumnAlignment(0) = 3 //DateSeconds - right alignment

me.ColumnAlignment(1) = 3 //Date

me.ColumnAlignment(2) = 2 //Check Nr - centered

me.ColumnAlignment(3) = 1 //Payee/Payer - left

me.ColumnType(3) = 2  //checkbox

me.ColumnAlignment(4) = 3  //Debit

me.ColumnAlignment(5) = 3  //Credit

me.ColumnAlignment(6) = 3  //Balance
Remember that everything beyond the double slashes is a comment and not part of the executable code. These lines show the column header and define the alignment of the data we will place into each column. In addition, we format column 3 to contain a check box.
Next, I define what happens when the program launches and transWindow opens. In the transWindow Open event handler I place the single command to execute the method, "readDataFile". A method in RB is simply a subroutine that completes a task or acts like a function and returns a result. The readDataFile method is as follows:
dim f As FolderItem // Pointer to file
f = GetFolderItem("Checkbook Data") // Give the pointer
      a value

    if not f.Exists then  // Make sure a file exists where the pointer
      expects it

    MsgBox "The data file is missing"  // Show a message if there's
    no file

    Return  // Stop execution of this method

    End
dim inStream As TextInputStream // Handler to read file

  inStream = f.OpenAsTextFile  // Define how it should work
dim s As String

  While Not inStream.EOF  // Keep executing the following commands until
    End Of File

    s = inStream.ReadLine  // Read a line of the file

    addTransRow(s, nTransactions)  // Add a line to transList

    nTransactions = nTransactions + 1  // Increment a counter

    Wend
inStream.Close //Close the text file handler
The logic in this method is to:
And now a word about datatypes: they can come in all sorts of flavors -- integers, doubles (decimal values), text (strings), arrays (both single and multiple) and many, many others. Before any is used it must be declared by the use of the dim statement within a method as you can see here. But there's another way to declare a datatype and that's as a Property that allows its use within the entire window without being redeclared and which also allows any method in the window to refer to it. It's maintained as a variable as long as that window is open. This is how the variable, nTransactions is declared. A property can also be declared as a Global Property that can be used by any window. We'll see the use of a global property in a later article.
The observant reader will have noticed that this method called another method called addTransRow, which is passed a line of text from the data file and populates a row in transList. This method accepts two variables: s as a string and lineNr as an integer. The code follows:
// Build a new row in transList

    dim record(5) As String // A six-element array

    record = Split(s, chr(9)) // Takes line and places each field in the Record
    array
transList.AddRow ""  // Add a blank row to transList

  transList.Cell(lineNr, 0) = Format(dateSeconds(record(0)), "#")  //
    Write date in dateSeconds into column 0

    transList.Cell(lineNr, 1) = record(0)  // Write date into column 1

    transList.Cell(lineNr, 2) = record(1)  // Write check Nr into column
    2

    if record(2) = "x" then transList.CellCheck(lineNr, 3) = true  //
    Mark checkbox if transaction has cleared

    transList.Cell(lineNr, 3) = record(3)  // Write Payee/Payer into column
    3
dim debit, credit As Double

    debit = val(record(4))

    credit = val(record(5))

    if debit > 0 then transList.Cell(lineNr, 4) = format(debit, "#,###.00")  //
    Write Debit into column 4

    if credit > 0 then transList.Cell(lineNr, 5) = format(credit, "#,###.00")  //
    Write Credit into column 5
// Unique case of transList line(0) - Brought Forward data

    if lineNr = 0 then

    transList.cell(0, 6) = transList.cell(0, 4)  // Balance

    transList.cell(0, 4) = ""  // Clear data in line 0, column
    4

    transList.CellCheck(0,3) = true  //mark checkbox

    end
The logic in this method:
Notice that on line 13, I defined two additional variables as doubles. RB doesn't have a convenient way to format decimal values unless they're being converted from numbers to strings. So I merely converted them to doubles and then back to strings. It also affords an easy way to filter out zero values so they're not displayed in transList.
Lastly, line 7 calls one more method, the function dateSeconds, which is passed the date from the array and returns the date in TotalSeconds as previously described. Here is its code:
dim d As new date

    dim s as double
If parseDate(t, d) then  // A Boolean function which is true
      if the date is valid

    s = d.totalSeconds

    return s

    else  //  And false if the date is not valid

    msgBox"Date " + t + " does not parse"

    end if
This method uses a RB function (parseDate) to do the conversion and returns the variable s as the date in TotalSeconds.
So far I've added lines from the data file into transList, each one with either a Credit or a Debit but there's been no mention of the running Balance for each line so I need one additional method to do that computation. Remember that the contents of transList is all strings (text) so I'll need some additional methods to do string-to-double conversions. This would be a good place to begin the next article.

Figure 5: The IDE with progress to date
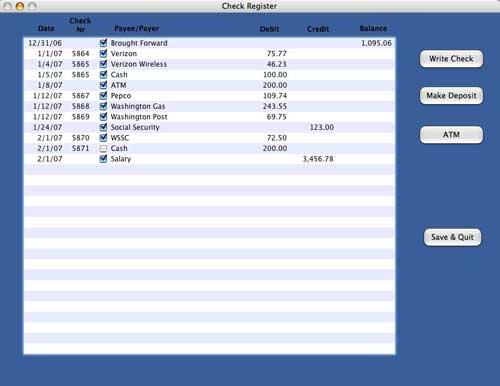
For now, Figure 5 shows the IDE to date. The left side shows all the Controls, Event Handlers, Methods & Properties that have been added. It also shows the code for a small method that does two functions:
The Check Register application folder (labeled "Source Code for Part 1"), as it is built to-date, can be downloaded from:
http://www.wap.org/journal/realbasic/
The folder contains both the compiled application, the data file which is read on launch and also the RB source file which can be examined by anyone who has downloaded a sample copy of RB.
The running application window