|
|
|
|
Form Object |
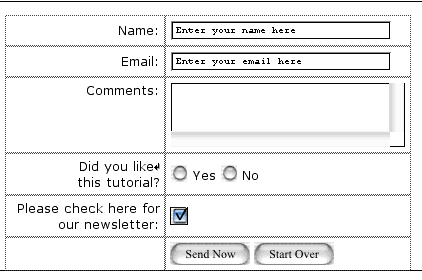
If you like, add a table to your page within the opening and closing form tags in which you can neatly lay out your form objects. I created a 6 row, 2 column table with a pixel width of 400. The left column is 125 pixels, and is right aligned. I added the following labels to the rows: Name, Email, Comments, Did you like this tutorial? and Check here if you would like our newsletter. (See the completed form here.)
|
|
|
Final form. |
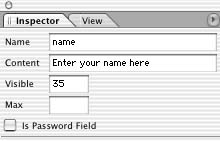
Next to the cell that contains the label "Name" drag a text field form object to the cell on the right. I name it "name" because the cgi script will then return the data to me as "name = Person's Name." I can add a default value to appear in the field to make the form more accessible to people with disabilities. I made visible 35 so that there is room for longer names.
|
|
|
Text field |
Now add another text field next to the cell that says email. I named it email and entered a value Enter your email address here." I again set visibility 35 to lengthen the text field so that it accommodates longer E-mail addresses.
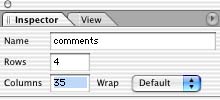
Next to Comments, drag a text area form object. Give it a name. This is like a text field, except that you have more room available for longer areas of text. Rows and columns allow you to designate the amount of space you want to show on the page.
|
|
|
Text area. |
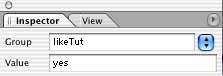
Now let's add some radio buttons for the question "Do you like this tutorial?" The key to radio buttons is to give all the radio buttons in the group the same name. That way, the user can select only one choice. I dragged two radio buttons next to the question. I named them both "likeTut" and gave one a value of yes, and the other a value of no.
|
|
|
Radio button |
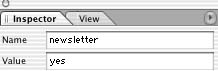
The last form object we will use is the checkbox. Drag a checkbox object next to the newsletter request. Give it the name "newsletter" and a value of yes. You can also choose the "Select" box if you want the checkbox to have a check in it by default.
|
|
|
Checkbox |
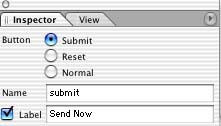
Drag a submit button (second form object in the form objects panel) to the page. If you select the label checkbox, you can change the default name "Submit" to something more meaningful. You can drag a reset button (third form object in the form object panel) to the page so that users can clear the form and start over if they like.
|
|
|
Submit |
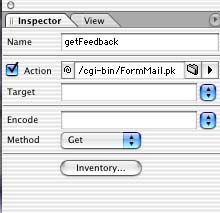
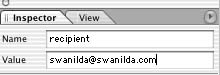
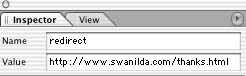
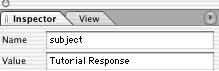
We're not done yet, however. We need to add at least one hidden field, so drag a hidden form object somewhere on the page within the parent form object. We need to indicate where the form data gets sent! Usually this is done with a hidden field you name "recipient" whose value you'll set to your E-mail address. There are other hidden fields you might want to consider adding to your form. If you want the E-mail you receive with the form data to have a subject when it comes to your E-mail box (rather than an empty subject field), add a hidden field named "subject" and create a meaningful subject name. If you want to create a custom page to which the user is directed after he or she successfully submits the form data, you can use the hidden field named "redirect" and enter the URL for the page.
|
|
|
Recipient |
|
|
|
Redirect |
 |
|
Subject |
Now that the form is all set up, it is time to make sure the script is configured for your server, and has the proper permissions set. First make a backup copy of the script in case you don't quite get it right the first time. This is not to mean that it is complicated -- it is extremely simple. Of course, it always is when you know how, right?
Open Matt's FormMail script in your favorite text editor. On the Mac the editor of choice is BBEdit Pro. It is nice because it color codes values and otherwise flags certain parts of the code for you. You can download BBEdit Lite for free, though, and it will do the job as well. If your editor does not color code, you'll just have to scrutinize the text a little bit to find what you are looking for. It is two lines close to the beginning of the script, so don't worry. At the top of the script you'll see text surrounded by a box created from # signs.
|
|
|
Configure script |
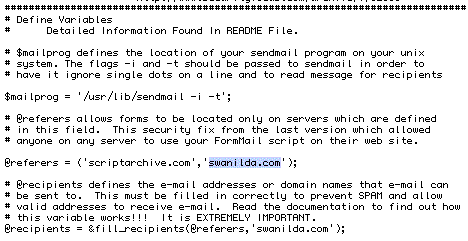
You want to find the part of the script that sets the referers and recipients allowed from your Web directory. You are looking for the following lines: @referers= () and @recipients= () Where you see my domain, swanilda.com, you want to enter your own values within the parentheses -- your domain or IP address. Be sure to leave the single quotes.
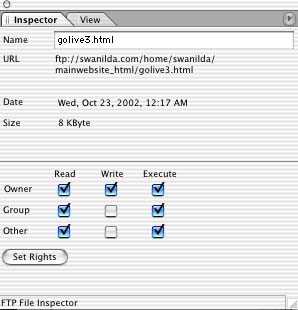
Now all you have to do is save and upload the script to your cgi-bin. Next you need to set permissions for the script. The usual permissions for FormMail is chmod 755 to make it executable. Using the Golive ftp client, select your file while connected to the server, and check the boxes for Execute.
|
|
|
Configure permissions. |
Now upload your html page to the proper directory, and the script to the cgi-bin. Test your form in the browser. Fill in some data and hit the submit button. The results should arrive in your E-mail! If you had problems, be sure to ask your ISP where the path to your cgi-bin is located...because that, uh, is beyond the scope of this article.