Related articles: iMac Benchmark, iMac Review
Apple's new iMac does not come with any instructions on how to add memory to the computer. Of course, it really doesn't come with much in the way of instructions for anything else, either. But Washington Apple Pi Labs, firm believers in the motto: "The More RAM the Better," decided that the 32 megabytes supplied with a standard iMac was Not Enough. Particularly since memory is cheap.
So we carefully examined the iMac case and quickly concluded: we had no idea how to get into it. After briefly considering The Dealer Option ("Hi! Could you install more memory in our iMac? Well, actually, it is someone else's iMac, but they gave it to us because we are Mac gurus, but..."), we decided to be brave and fake it.
Step Zero: ground yourself. Static electricity is invisible, but each year it kills more computers than almost any other source except creamed coffee. Wear cotton clothing and either cotton socks or bare feet. Wear a grounding strap, properly grounded. (Wearing a grounding strap and failing to ground it is pointless, but commonly done. Don't do this.)
Step One: place the iMac face down on a large beach towel. Be sure and wash it first; getting sand in the iMac probably isn't a good idea. We used a big blue beach towel with pictures of tropical fish, but any clean beach towel should do. Or a soft cotton bathrobe, or cotton bedspread, or...
|
|
|
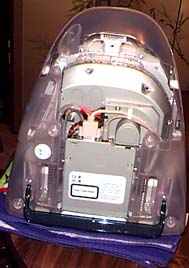
Place the iMac face down (monitor down) on a clean, soft cotton cloth. We used a large beach towel. Note the oval handle at the end of the bottom cover. (Why cotton? It is soft, doesn't scratch, and doesn't retain a static charge.) |
Step Two: there is a single retaining screw holding the bottom cover in place. Remove the screw with a Phillips screwdriver
Step Three: using the plastic handle built in to the bottom cover, carefully pull up and out to remove the bottom cover. Figuring out how to pull the cover off and unclip the various flanges holding it in place will take much longer than removing the screw. At this point you may be thinking, "This is way more complicated than installing memory in a Power Mac G3 desktop." Then you'll realize: an iMac is a Power Mac G3 desktop. Oh, joy.
|
|
|
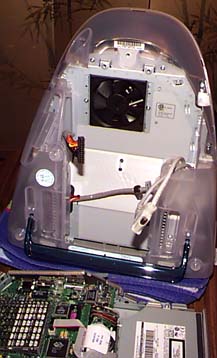
Once the bottom cover is removed, the logic board is exposed. Note the CD-ROM drive at the bottom, with various cables plugged into it. |
Step Four: disconnect the cables connected to the logic board. Some of these pull out, some have twist connectors, and one is held in place by a clamp. Take mental note of how each one connects (or take notes on paper if you wish.) Remember that variety is the spice of life.
Step Five: note that there is another, smaller handle at the back of the logic board (now the "top" end of the board). Inside the handle are two retaining screws. Remove these screws, using a smaller Phillips screwdriver than you used earlier. Don't drop the screws into any of the slots. (Good luck.)
Step Six: pull up on the logic board handle to remove the logic board. Take care not to get tangled with the cables you disconnected earlier. Place the logic board on a flat, stable, static-free surface. Say to yourself, "I can't give up now; I've got to put it back together again."
|
|
|
Once the logic board is removed, you can see an internal fan (which just happens to be located over where the processor normally sits). You also can't help but notice that the vast majority of an iMac's bulk is occupied by the monitor. |
Step Seven: the memory expansion slots are under an EMI (Electro-Magnetic Interference) shield on the center of the logic board. This lifts off easily; it is held on by the flanges on the sides.
Step Eight: the main memory slot is located at the center of the logic board next to the processor. There is another one allegedly located under the processor, but we had no desire to check. Insert the memory module at a 45-degree angle and carefully press down until it clips under the flanges at the sides of the slot. The memory module should be firmly seated; don't resort to extreme force, but don't expect the module (or the iMac) to work unless it is firmly seated in the memory slot.
|
|
|
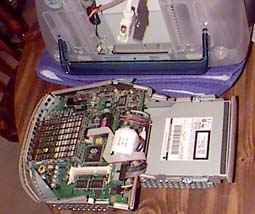
The square structure on the left of the logic board covers the iMac's processor and memory. On the right, the large square box is the housing for the CD-ROM drive. |
Steps Nine-Fourteen: replace the EMI shield, and slide the logic board back in place. When sliding the logic board back in place, make sure the CD-ROM drive door fits through the slot in the front of the iMac (you might need to slip your hand under the front to check the alignment). Reconnect the cables, screw in the logic board handle retaining screws, replace the back cover, and replace the retaining screw.
Step Fifteen: plug everything back in and test the iMac.
Step Sixteen-Thirty-seven: redo everything after you finally admit you didn't properly seat the memory module in the memory expansion slot. Then redo parts of the procedure again after dropping one of the screws into a slot.
Step Thirty-eight: plug everything back in and test the iMac.
Step Thirty-nine: tell everyone, with a modest air, how you've installed -- three times -- iMac memory.
![]()
Revised December 13, 1998 Lawrence I. Charters
Washington Apple Pi
URL: http://www.wap.org/journal/