


This article illustrates the general principles of lighting and composition, all for the purpose of capturing a memorable interview. In future articles, we will deal with capturing high quality sound.
For the beginning pro, it may seem that any given video situation involves an almost overwhelming array of choices and problems to be dealt with. When you consider how interrelated they all are, confusion may set in. I have seen quite experienced professionals lead themselves down blind alleys and get totally confused. Backing out of this, with others watching impatiently, can be uncomfortable! Let’s break all of this down into steps, laying out a logical plan for dealing with a particular interview shot.
The premise we will work with here is that you’ve been asked to record an interview for a local history project. The subject of your interview is an elderly gentleman who was witness to great changes in the neighborhood over the past many decades.
(In our scenario, video editing will be done later, which at once simplifies, and complicates things. More on this in a future article. This point is just to get you thinking.)
You are told that to keep consistency with other segments of the show, you should get ready for the traditional sit-down interview, also known as the off-camera interview. The terminology is self-evident when you see the main or `master’ shot:
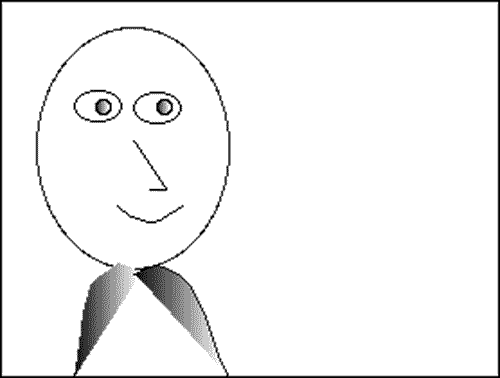
Figure 1: The off-camera look…
Rather than attempting to show both sides of the conversation, we focus on the person whose story it is we are telling. It is very common for the person asking the questions never to appear on screen. Notice that the person is looking not into the camera, but to one side of the camera lens - i.e.: off-camera.
You’ll also notice that the placement of the head and shoulders in the frame is not random - the person is quite evidently situated on one side of the frame (or viewing area), and they are looking into the available space. This space is going to need treatment - through appropriate lighting and background - to be supportive of the content of the interview, but not be unduly bright, distracting or otherwise ugly.
What we see here is a very typical news style interview, but also quite recognizable in traditional documentaries - you may have observed just this sort of shot in your favorite program on `The History Channel.’
Our objective has now been defined - we need to get a pleasing and interesting shot of this person, with the appropriate placement of lights, camera, and background.
It makes sense to commence with something that cannot easily be changed once we are committed, so why don’t we first get control over that background?
Here are some simple `rules of the road’ for you to follow:
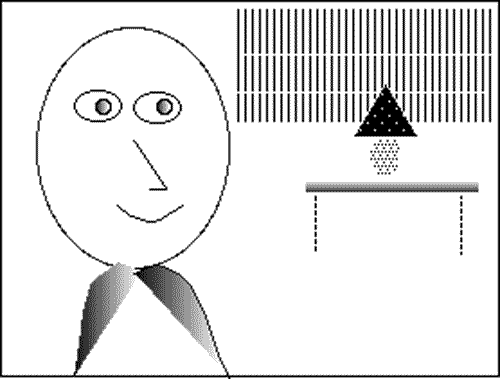
Figure 2: Off-camera composition, now with basic background elements arranged.
We’re having some good luck. Our subject happens to own a nice set of books arranged on a wall shelf, and it was relatively easy to move a coffee table and lamp into the scene.
We now have made some progress. The bookcase lends the appropriate context for our interview, and we put a small dimmer on the power cable for the table lamp, bringing the brightness down so that it is not too distracting as the background element. (If you have not tried this before, you will be surprised at how low you have to take the dimmer to get an acceptable brightness in the viewfinder. I carry a spare 25 watt lamp on locations, making it easier to get larger fixtures dialed in appropriately - we simply unscrew and replace the higher powered lamp).
Try this for yourself, and you’ll start to see the balanced composition coming into play.
We have now placed the camera and subject relative to the background. We can now show the position of these elements, and the person conducting the interview, with an overhead look...
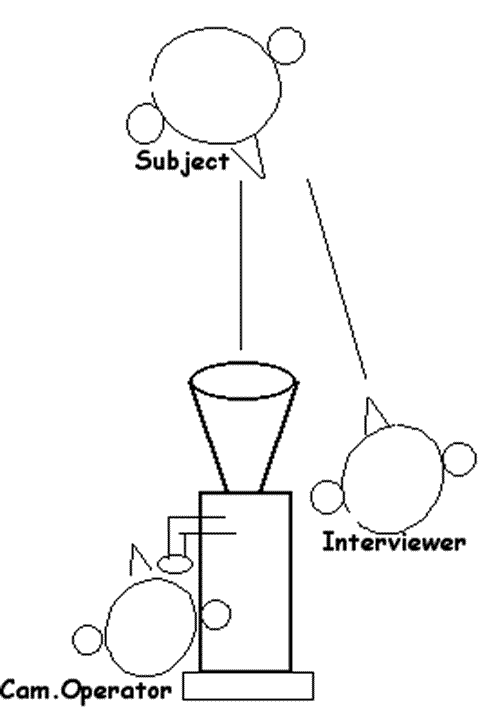
Figure 3: Overhead view - camera, camera operator, subject, and interviewer.
We have not yet touched upon two important elements here - what are the distances between (1) the camera and the subject, and (2) the subject and the background?
Without getting too involved, too early, I would recommend that you try to get the subject as far from the background as possible, balanced with your interest in moving the camera well away from the subject. Why would you do this?
Increasing the distance from the subject to the background (our table, lamp, and bookshelf in this case) enables us to ‘push’ the background out of focus. At upcoming classes at Washington Apple Pi in Rockville MD, we will demonstrate this. (For you unable to attend, we will have images available for future release, either through the Web site or via DVD/CD formats). You can best arrive at an understanding of this design concept simply by trying it and examining the results - but I can tell you that bringing the subject into sharp focus against a soft background is one of the easiest creative tools you have for concentrating audience attention on the person being interviewed. (Professionally, it is often used as an emergency measure for dealing with distracting but out-of-control background elements - people staring back into your camera, unduly bright lights, etc).
In this way, space is your friend. The larger the room, the more you can play with these distances. Moving the camera back from the subject means that you will be shooting the interview on a more fully zoomed, or `long’ lens - at the telephoto end of the lens’s zoom range. Again the subject becomes isolated from the background. In this case it is the depth of field being used to bring the subject’s face into sharp relief against a soft, perhaps textured background. As with distance-to-background, you will best arrive at understanding by trying different camera positions and looking at the results.
A mantra of one of the most creative camera people I know (Dave Lent of Dave & Co., Bethesda) is: The Best Light is No Light. While this statement is probably easily misunderstood, I think what Dave is trying to make us think about is the fact that light should only be added if necessary.
Commercial video production, especially in the news format, relies on certain expectations from the client, and also that progress be made as efficiently as possible after entering a room that we have not seen prior to the shoot.
What this means, unfortunately is that people hired to light and then shoot an interview will rely on a somewhat methodical approach to lighting in a time-effective manner, with results known to be acceptable to the client. It is safe, but does not allow for experimental work that might lead to some creative breakthroughs. Nowadays the more freeform, creative approach tends to be restricted mostly to the dramatic, comedic or amateur production formats.
Let’s take what we can take from this, by building a very traditional lighting plot that virtually guarantees good results. In your own time and place, you should go ahead and play with `the rules’, bending, and then breaking them as you see fit. Just make sure that you have learned them first!
Our first light to discuss is the Key Light. This is typically a light source that is physically large in relation to the subject being lit. If the subject in our case is a person’s face, we’d be best to light it with a source that is at least 2 feet across, and not more than a few feet from the face.
Why? A large light source is a soft light source. `Large’ is open to interpretation, of course, but as a source gets closer to a subject, as well as getting brighter (in the absence of controlling brightness), it becomes larger in relation to the subject, and softer.
Think of the sun - on a bright clear day, all cast shadows have hard, well defined edges, surfaces glare, and faces look harsh and dramatic. The sun is physically huge, but relatively tiny to the subject - it is almost an apparent point source of light (it is 93 million miles away!). On a completely cloudy day, what has happened? The source (sun) is now being totally diffused through a cloud layer.
I smile on days like this - my job is easy when I am working with an on-camera reporter. With thoughtful placement against a background that is somewhat less bright than the subject’s face, our lighting is pretty much done. We are not looking for electricity.
The soft light source has benefits for the type of interview we are doing:
Designing a soft light is really a subject in itself, but for now, think about the creative use of white card (bouncing a light into it), another table lamp, white sheets - these are all readily available tools for changing a perhaps naked light source into a softer source. Commercially setup soft lights typically use a collapsible fabric grid that has a powerful lamp inside it. It is something like putting a light inside a tent, and being on the outside to utilize the illumination that results.
In commercial work, I typically use a 1,000 or 2,500 watt tungsten lamp inside a fabric `soft-box’ - it may sound like a lot of power, but once two or more layers of heat resistant fabric are attached to the front opening (with Velcro), this `lighting weapon’ is essentially reduced to a nice and useful glow.
Be careful if you are replicating these effects with household materials!
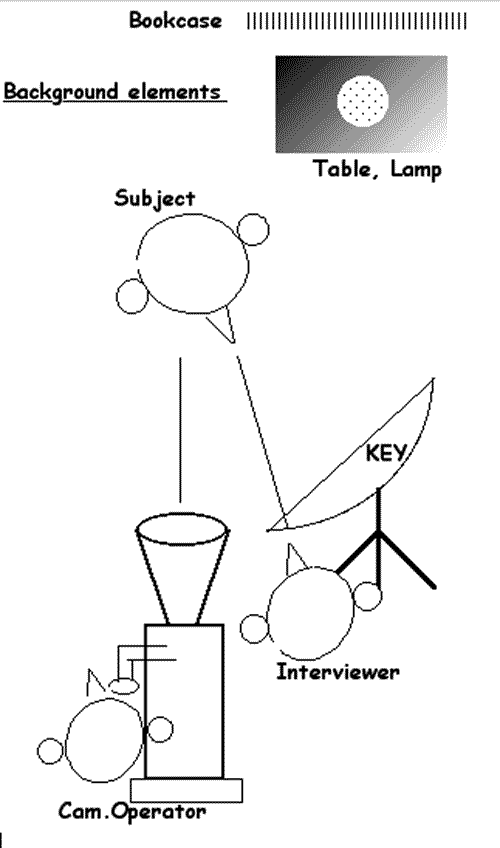
Figure 4: Overhead view of interview plan, soft Key Light placed and background elements showing.
The soft light has now been placed (Figure 4). Note the position of the soft light - it is not a coincidence that it is on the same side of the lens as is our reporter. One way to describe this is `off-camera key lighting’. It is positioned so that the side of the face most strongly illuminated is the one slightly away from the camera.
To make this easier to understand, and also the motivation for doing this - draw an imaginary line from the camera lens to the tip of the subject’s nose. If we take the camera view, the right side of the face/right cheek is turned somewhat away from the lens, the left side turned towards it. Does that make sense?
Here is a closer look:
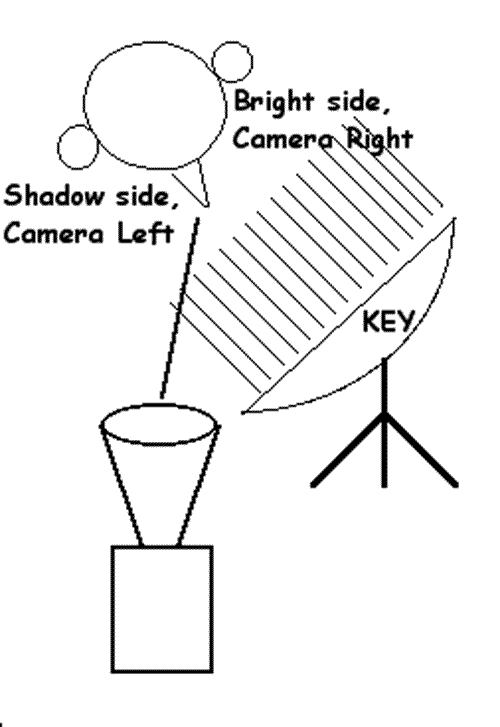
Figure 5: Off-camera key lighting is providing brighter, and shadow areas on the subject’s face. The shadow area is closest to the lens.
I recommend that you establish a position for the key light, examine the results, and then experiment with moving it in an arc towards the camera (which would be clockwise as we look down from above) and away from the camera. What happens? Try moving it in and out. Finally, make arrangements to put a dimmer on it, and play with this variable too. A dimmer will allow you to feather the light’s brightness way down, move it in closer to the face and therefore turn it into a still softer light source (remember the distance effect?).
We have:
Good enough. Are we done? Well, the answer to that all depends... Let’s finish this exercise with an introduction to the Backlight.
The Backlight is arguably the most important light you can use, but also the most easily misused. It is set behind the subject, aimed at the back of the head and shoulders. Gently does it! Incorrectly placed lights will be in the shot, will cause lens flare (that objectionable halo effect caused by a light shining directly into the lens) or will be too obvious - perhaps spilling down and across high cheekbones, and causing distracting shadows on the chest area.
This light is typically a small hard light source, suspended out on a sidearm from its light stand. Look at Figure 6. The hatch area shows the targeted area of the subject - head and shoulders. The light is above our subject’s head, aimed down at it and the shoulders. The sidearm helps in getting the stand safely out of the shot.
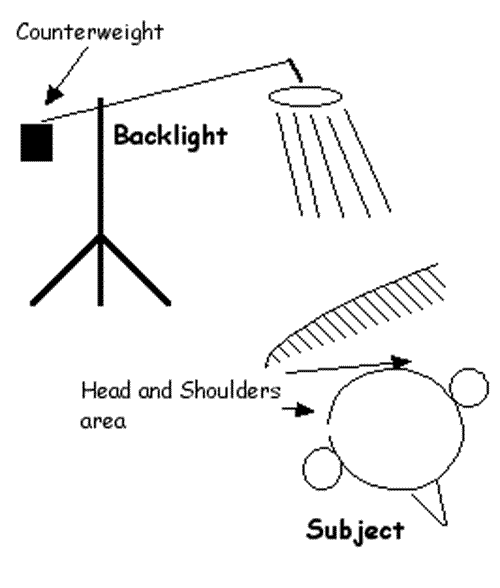
Figure 6: The backlight. A bit harder to master, but perhaps your most important lighting trick.
The purpose of this light is to give dimension to our subject, and help define them against a background with which they may otherwise be merging. We are creating the illusion of three dimensions in a two dimensional format (the TV screen).
Practice this and you will see the desired result. Raising the light higher lessens the risk of getting lens flare. Judgment is required with older subjects - thinning or no hair may motivate you to use a tiny amount of backlight, or none at all. Backlight against a totally black background is irrelevant.
Because this light involves slightly more equipment, you may need to innovate. Hardware stores are a great place to use your imagination - for example, C-Clamps will allow you to mount lights on door edges, bookcases, etc. But do be careful.
We now have a good basic setup for the off-camera interview. As you try to tweak your master shot, you will discover that moving one element may involve having to make compensatory moves in all the others. If confusion sets in, back up, and just change one thing at a time. Take notes. They will be valuable to you later on. If editing is to take place, try to be present when it happens. You will complete the learning experience that way. Good luck!
In a for-real shoot situation, negotiate with yourself and others for a final 15 seconds to step back and look at what you’ve done, before you roll tape. You’ll be surprised at the very basic things that get overlooked in the heat of the moment. One cameraman in the West Coast market refers to this as `Blessing the Shot.’ It is your safety net, and a great idea.
ProCamera 101 is the first in an occasional series on the art of purposeful camerawork. In future articles we’ll deal with individual aspects of getting great shots - and we’ll address questions that inevitably come up.
Your inquiries are all welcomed - please write to me at grantpeacock@mac.com. Let me know which areas you would most like to focus upon in the future.