Transferring Files from Your Old
Mac
by Rick Rodman
Washington Apple Pi Journal, reprint
information
So there it sits in its resplendent beauty, your new G4
Tower. Its processing power is awe-inspiring, its storage
gargantuan, its graphics stunning and vibrant. The keyboard
is a delight for the typist, the optical mouse, like a clear
bar of soap, elegant and precise.
In the corner on a battered oak desk sits a yellowed Mac
Quadra 650 with its little monitor and enormous "surfboard"
keyboard, and an ovoid mechanical mouse. All these years it
has served faithfully, growing a little from time to time
with small additions of RAM and upgraded software, until the
day came that the tasks you had in mind were beyond its
capabilities.
So today you face the dilemma that many have faced: how
do you transfer your data files and documents, and maybe
some applications as well, from your old Mac to your new
one?
In this article we won't be specific as to the two
machines, but will discuss the two techniques that can be
used to transfer files from an older machine to a newer
one:
1. Stacks of floppies, Zip disks, CD-Rs, or other
media.
2. Ethernet.
In order to select the best method for your particular
case, you will first have to think deep and long to answer
the following three questions:
1. What do you intend to do with your old Mac?
If you intend to keep your old Mac in operation, it may
make sense to add components to it, for example, networking
parts. If you intend to give it to a friend or donate it to
the WAP Recycling Program, it makes more sense to add
components to your new system.
2. How much money -- and how much time -- do you have
available for the project?
The answer to this question is usually a tradeoff. For
example, if money is very tight, but plenty of time is
available, you can email the files to yourself, or use
stacks of floppy disks like a PC user would.
3. What methods are open to you, given the type of old
Mac you have?
If your old Mac has the 1.4 megabyte floppy drive once
known as the Superdrive, you can use the stack-o'-floppies
method. Just buy a USB floppy drive for your new Mac, make
floppies, and read them in. The VST drive I have only works
under Mac OS 9, not in X's Classic mode.
If you have a Mac Plus with low-density drives, the stack
o'floppies method is the only way, and you''ll need another
machine to copy the disks to high density, unless you can
find a USB floppy drive that reads low-density disks. Mine
doesn't.
Most Macs can use the Ethernet method, however, which is
a lot easier and faster, and usually cheaper.
If you have a Mac SE, LC, or similar model with Ethernet,
you can connect the machines with a reversed 10BaseT cable.
If the machine doesn't have the Ethernet card, you may wish
to see if you can find a card for it inexpensively.
If you have a Quadra or Centris machine, or an earlier
Power Mac, most of these have an Ethernet port called an
"AAUI". It looks like a tiny Centronics port, about half an
inch long, with a symbol near it that looks like this:
<•••> (Note: the dot in the middle is
option-8.) Many PowerBooks also have the AAUI port. To
interface this port to 10BaseT Ethernet, you need a gizmo
called an AAUI 10BaseT Transceiver. These are available
very cheaply on the used market.
The Centris 610 uses a small Ethernet card identical to
that used in the LC-III. These cards are also available
inexpensively on the used market. The Mac II series does not
have built-in networking. You can look for a NuBus Ethernet
card; many are available on the used market.
Lastly, there are some PCI machines that apparently don't
have AAUI ports. For these, you will have to locate a PCI
Ethernet board which comes with Mac drivers. It won't do
much good to get one-dollar PC clone cards at a flea
market.
Remember that it only makes sense to buy parts for the
old Mac if you intend to keep the machine, or if your time
is very valuable. If you do intend to keep your old Mac, or
to pass it on to a child or significant other dwelling in
your domicile, it is an investment that will repay itself
beyond the initial transfer of files. You will be able to
share printers, share a high-speed Internet connection, and
even play multiplayer games.
Stack-O'-Floppies Method
If you're using the stack o'floppies method, you may skip
the rest of this article. You certainly have a lot of work
to do, so the sooner you get started, the better. I do
suggest disregarding any ideas of using Disk Doubler,
MacZip, Stuffit, or any other approach to save disks.
They'll waste far more time than they are worth.
Of course if you can use Zip disks on the old machine, go
ahead and get a USB Zip drive for the new one. And if you
can write CDs on the old machine, go ahead and do that.
Using Zips or CDs has the side benefit of producing a backup
as you transfer, which is a very good thing.
Connecting the Network
Once you have 10baseT ports on both computers, you can
either connect them with a single pair-swapped patch cable,
or you can use two "straight" patch cables and a hub. I
have seen the pair-swapped cables at Best Buy, hanging right
next to the straight ones. Make sure you get the right
kind. Plug all the cables together. If you use a hub,
hubs usually show green lights when there is a good
connection.
Setting up file sharing
The instructions that follow are for Mac OS 9.1 on the
new Mac side, and pretty much any Mac OS on the old Mac
side. While it's supposedly possible to share files from
Mac OS X, I have not been able to get it to work at all.
Maybe 10.1 will fix that. [Mac OS X works fine, but
there are some additional complications - Ed.]
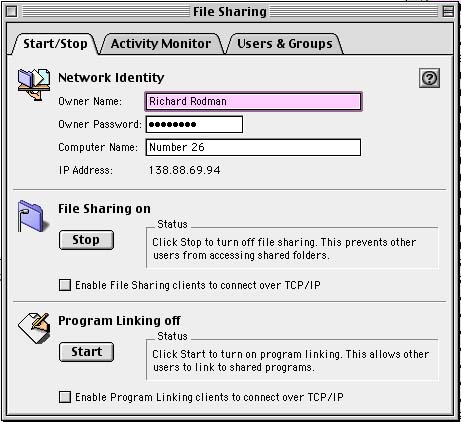
On the new Mac, open the File Sharing control panel. It
has three tabs at the top. On the first page is a button
labeled "Start." Click this to start file sharing.
Starting file sharing will take a while.
While file sharing is starting up, think about this. You
can transfer files as a Guest or as a Registered User. The
former is slightly easier, but has some restrictions. If
you want to be able to transfer files as Guest, you will
need to enable the Guest user on the new Mac.
|
|
|
The File Sharing Control Panel allows you to
specify the owner of the computer, a machine
password, and give a network name to the computer,
as well as turn File Sharing on and off.
|
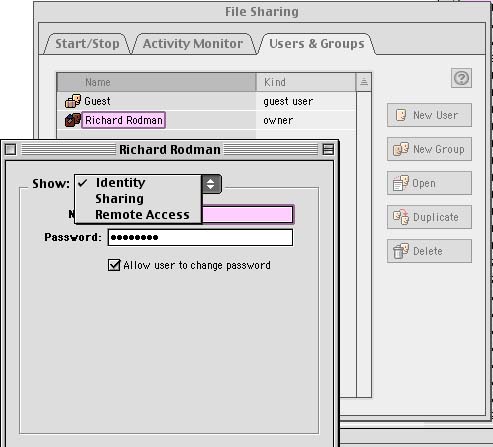
To enable the Guest user, click the "Users and Groups"
tab. You'll see two names, one the "Machine Owner," usually
someone you never heard of -- "Richard Rodman," in my case
-- and the other, "Guest." Double-click on the "Guest" and
you'll see a dialog with a button in the middle that has up
and down arrows on one end. That button is called a "pop-up
button," when you click the arrows it changes values, sort
of like a pull-down but without pulling down. Anyway,
switch it to "Sharing" and two checkboxes appear. Check the
checkbox that is labeled "Allow guests to connect to this
computer." Then click OK to close the dialog. Wait for File
Sharing to finish starting. It will take about a minute, or
more.
Now, close the File Sharing control panel and open your
hard drive icon. Create a new folder. You may call it
"Sharing", or "Rick Rodman's Shared Folder" or something
like that. Under Finder's menu, Get Info leads to a little
menu, General Information and Sharing, when you have a
folder selected. Make sure your new folder is selected and
go to the Sharing menu item. A dialog appears with a
checkbox and some security-related items.
|
|
|
The Users & Groups panel, part of the File
Sharing Control Panel in Mac OS 9, allows you to
create lists of users who can share files across
the network with a machine and assign them
passwords.
|
First, click the checkbox "Share this folder and its
contents". Then, examine the security-related items.
You'll see a line for the Machine Owner, "Richard Rodman" in
my case, a line for a selectable "User/Group", and a line
for "Everyone". The Everyone line refers to Guest. If you
want to use Guest, click on the graphical "pop-up button"
and select "Read/Write." This one actually works sort of
like a drop-down. An eyeglasses-and-pencil icon should now
show next to Everyone.
Click OK to close the dialog. Your folder icon now has
an ugly wire hanging off it. That means the folder is
shared.
Opening the shared folder from the old Mac
Go to the old Mac and open the Chooser. Click the
Appleshare icon. Over on the right, in the box now labeled
"Select a File Server," you should see the name of your new
Mac, "number26" in my case. Click it to select it, then
click OK. A series of two dialogs will follow.
The first dialog wants to know whether you want to
connect as a Guest or as a Registered User. If you want to
connect as Guest, click that and click OK. If you want to
connect as a Registered User, click that, type the name of
the new Mac's Machine Owner, type the password in the
password box, and click OK. (Oh, you don't know the
password? Go back to the new Mac, open the File Sharing
control panel, go to the Users and Groups tab, double-click
the Machine Owner and set the password.)
The second dialog says, "Select the items you want to
use." If you connect as Guest, you'll see the name of your
shared folder as the only item. If you connect as the
Machine Owner, you get a surprise - you see the name of the
entire hard drive! Yes, as the Machine Owner, you can see
the whole machine, not just the shared folder. I'm not even
sure whether you have to create a shared folder at all.
There is also a checkbox to reopen this folder every time
you start up your Mac; don't check that.
Once you click OK, an icon appears on your desktop for
the shared folder or drive. Open it and copy all the files
you like, in either direction. When you're done
transferring, drag the icon to the trash.
I do recommend that you make backups of the files
transferred before you erase them from the old Mac. And
while I'm recommending things, here's a nifty system
extension that lets you open Joliet-style CD-ROMs on your
Mac: http://www.tempel.org/joliet/. It works perfectly.
Why is this so complicated?
Remember, this feature wasn't designed only for upgrading
systems. This networking system is designed for an office
with many users, with different security privileges on
various machines. When you think about all that it does,
it's quite simple and elegant. (If you think this is
complicated, wait until you see the networking stuff under
Windows.)
If you're passing your old Mac on to another member of
your household, you should probably set up usernames and
passwords for each person, with shared folders and
permissions set appropriately, so that you can share things
and keep other things private. Make your wiring more
permanent, so that you aren't tripping over cables. Buy a
small UPS for each machine. A Mac network is easy to
administer -- it'll take very little of your time, yet add
much convenience and pleasure to your life.
|

