Day 1
This is a true story about actual events and real people. Only the names have been changed to protect all those involved. It was a nasty job, but somebody had to do it. My name is Fred, and hers is Bob.
It was a hot and muggy afternoon in Columbia after church drama rehearsal, and a long discussion about "aminals vs. animals" and "ahks vs. arks." Bob has a cute Bostonian accent, granted, but "ahks" was going toooo fah.
While drinking a couple of Cokes, Bob suggested we start on The Project. I told Bob not to throw such words around casually, and reminded her that projects of this type usually require three trips for supplies, and two Band-Aids. But, none-the-less, it was a good idea - it had to be done sooner or later. So we ripped open the box, and started on The Project.
Piece C was scratched, and connector H was nowhere to be found, but we trudged on regardless.
"O.K., give me connector H," I said."I thought you had connector H."
"Well, I don't. Where is it?"
"If I knew, I'd give it to you!"
"Let's just skip this step and go to step three."
"We're on step one: what happened to step two?"
"That page is missing."
"No, I'm sitting on it!"
"And I'm sitting on connector H!"
"Ouch!"
We got all the way to step five without any more hitches. But then we needed our first Band-Aid: Bob had cut her finger while turning a page in the instruction manual.
"Ow-how-wow-ow-ow!" Bob shrieked."What?"
"I cut my finger!"
"On what?"
"The instruction manual!"
"Oh, you're talented! We're licensed to [Word edited for the safety of Bob and Fred. Thank you for your cooperation. You may now go back to watching your fish flutter in the wind], but you should've been a brain surgeon!"
The next step required putting washers in all B brackets, which required a hammer, which required our first trip for tools. But this wasn't the extent of our bracket problems.
"My washer won't fit in my bracket!" I told Bob."Don't you mean your bracket won't fit around your washer?"
"Same difference! It just won't fit!"
"Let me try!"
"No! I'll get it."
"Use the hammer."
"I did!"
"Use it again."
"You!"
"Fine, give it here."
"No! I'll get it!"
We decided it was time for a Coke.
We started off with a bang. That is, we dropped all eight legs down the stairwell, and lit a match while checking the gas valve. (Ha,ha! But seriously folks...)
"The thingamujig won't fit in the thingy, so I can't get the thingamabobber off!""Say what?"
"The thingy won't fit around the thingamujig, so I can't get the thingamabobber off!"
"You're trying to tell me that the thingamabobber won't come off until the thingy goes into the thingamujig?"
"Yeah! I never thought of it that way!"
After this technical explanation, it was decided that a greater force was necessary. We were forced to call on: Mommy Power.
"MOOOOOOOOOM!" (That word is quite impressive in unison.)
Once we had explained the problem, Mom used her magical powers to fix the thingamujig, the thingy, and the thingamabobber. We stood in awe as the Project took shape. Bob and I thanked Mom for her help, and dived back into work.
Step 11 caused both our second trip for supplies, and our second Band-Aid to be used. The brackets with washers we had prepared the day before had to be inserted into holes in planks C and F. Unfortunately, one hole in the same place for both C and F wasn't deep enough. We had to get a file and work the wood down.
It was while doing this that I jammed the back of the file into my palm. Inappropriate dialogue followed, but, eventually, we filed the wood down so the brackets would fit. But wait: one bracket was misshapen, and wouldn't fit in! Time for: Mommy Power!
"MOOOOOOOOOM!" (Again in unison.)"What now?"
Bob calmly and rationally explained that, once again, the thingy wouldn't fit in the thingamujig. Mom fixed it, but suggested that we take a break and sleep on it. We informed her that this might hurt. She agreed, and reworded her suggestion to say that we should pull an all nighter; a sleepover.
First, Bob and I took a Chocolate Break. We each poured ourselves a cup of hot cocoa, and planned what to do next. Sadly, we never got there. We fell asleep just after the Hershey Kisses War.
This day started off bright and early. Oh, I'd say noonish. Fortunately, the only things left to do were to attach the miniature shelves for the speakers and the back panels. Yeah, right! The only things to do...
To attach the miniature shelves, we had to twist two poles into plank C, the one that had given us trouble with the brackets and washers the day before. The instruction manual allotted a time period of 4.7 seconds for this particular step. Then again, the instruction manual allotted a time period of 30 minutes to complete The Project, including a four-minute pit stop. Where do they get the psychos who write this stuff? How do they sleep at night? Ah, well. The intricacies of life.
"Fred! Help me!""How complicated can it be? You're screwing a pole into a plank!"
"It's screwed in, but the holes are facing in instead of out, and if I loosen it, it's too loose, but it can't be screwed in more!"
After an hour and a half of grunting, huffing, pulling, and pushing, we got the holes facing out. That was 89 minutes and 55.3 seconds too long. (Would you believe me if I told you that I did that calculation in my head?)
Anyway, we pushed The Project into the corner after that so we would have more floor space. But we were sure to leave enough space to allow us to get in behind it and work. Well... I'll just say that there wasn't enough space.
It was quite simple, really. Try to screw the screws through the pole into the back panels to secure them. We had to use an Allen wrench to do that. The concept went something like this: screw the bolt in about two turns, drop the Allen wrench, stoop over looking for the wrench, get stuck between The Project and the wall, whine at your friend, get unstuck, try again. After this happened about three billion times, we decided to pull The Project away from the wall. But by that time, all the panels were securely bolted. We're just a little slow on the uptake.
"So, what's next?" Bob asked me."Nothing."
"Coke?"
"Nope."
"Chocolate Break?"
"Nope."
"Sleep over?"
"Nope."
"What then?"
"Nope... oh, I mean we're done."
"We're done?"
"Yup!"
"Can we have a Chocolate Break with a Coke followed by a sleep over to celebrate?"
"Yup!"
"Can you say anything other than 'yup'?"
"Yup!"
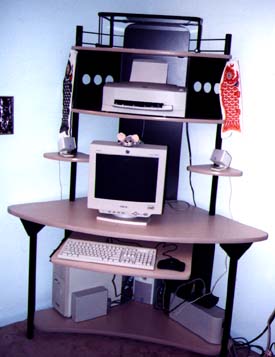
That was it. The Project was complete. We had built my new computer desk with a washer, a brace, seven nails, a bolt, a snapped Allen wrench, and a "we're-not-quite-sure" to spare. As it turned out that wasn't the end: Bob and I installed plank F upside down, but that leads to a different adventure. Once again, this is a true story about actual events and real people.
Bob and Fred signing off.
|
|
|
Take very careful note of the fish. (And you thought I was joking about watching your fish flutter in the wind!) |
Desk Specs:
Tower Corner Computer Desk
M&M Industries, Inc.
List price: $399.95
Available at Staples for $199.99
Catalog # 843482-73
(1-800-333-3330)
Dimensions: 72"H x 48"W x 48"D
Features a pull-out keyboard drawer
![]()
Revised November 10, 1998 Lawrence I. Charters
Washington Apple Pi
URL: http://www.wap.org/journal/