Using the new Dreamweaver PHP Authentication
Extension
(Look Ma, no hand coding!)
by Sheri German
Washington Apple Pi Journal, reprint
information
I am sure that some of you who are following along with
the PHP and MySQL series that the Journal has been
featuring recently, are saying to yourself, "Well, then,
isn't it nice to be a programmer -- NOT!" OK, I understand
that, and fortunately there are now a number of visual tools
to allow you to create database driven Web sites without
having to type code. One such extremely popular tool that
some of you may use is Dreamweaver MX. As it ships, it
typically has more built in behaviors for ASP and Cold
Fusion than it does for PHP. Still, developers are quickly
writing PHP extensions to make Dreamweaver quite a robust
tool for developing PHP/ MySQL Web Applications.
A recent addition to the PHP arsenal is an authentication
system. You can download the new free authentication
extension at the Macromedia Exchange. Much like Photoshop
plugins, Dreamweaver extensions add capabilities in a
modular fashion to the base program. The current tutorial
will use this extension that allows us to visually create a
log in system -- without knowing a lick of code. (Author's
disclaimer: I still believe that it is always a good idea to
try to get at least the basics of any language, such as PHP
and SQL, that you are attempting to use in the visual
environment. Otherwise, when things break, and you have been
wearing "no helmet," your application might get seriously
injured)
The extension in question is available at:
http://dynamic.macromedia.com/bin/MM/exchange/main.jsp?product=dreamweaver
In the jump menu for browsing extensions, choose "App
Servers." The PHP User Authentication extension is on the
third page of this list. Do not get confused with the
authentication that Macromedia is offering for sale in its
Developers' Resources Kit.
This tutorial will assume you know how to define a site
in Dreamweaver, and setup your testing server to process PHP
pages. You might want to refer to earlier articles in this
series (Nov/Dec 2002; Jan/Feb 2003) to refresh your
knowledge of how to make a MySQL database, create forms, and
prepare your computer for database driven pages.
Step I: Create your MySQL database
First we will need to have a database in order to store
and add user information. Let's create that now. Keep it
simple for your first authentication system. I have fields
for the ID (primary key and auto_increment), username with a
VARCHAR of 20, password with a VARCHAR of 20, firstName with
a VARCHAR of 30, and lastName with a VARCHAR of 30. Later,
when you get comfortable using the extension, you may want
to have access levels (such as admin and member) and E-mail
address.
Step 2: Create the pages for the login system
Create a folder for your login system and place it in
your Web Server's Documents folder. Define a site in
Dreamweaver, and set up the Testing Server category. Now
let's add the pages we will need. It is usually easier to
set them up before you begin adding forms and code. For this
tutorial we will have the following pages: login.php,
registration.php, sorry.php, taken.php, and restricted.php.
(Note: Some of these pages could actually be simple HTML
pages, such as the sorry and taken pages.)
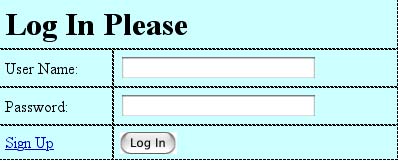
Step 3: Create the log in page
- Open the login.php page.
- Insert a form.
- Make a table within the form with 3 rows and 2
columns.
- In the left-hand column, type in the top row User
Name:
- In the left-hand column, middle row, type
Password:
- In the right-hand top column insert a text field.
Name it username (or whatever you named the username
field in your database). This is the key! The name of the
form object (in this case a text field) and the field
from the database need to match exactly. And remember
that UNIX is case sensitive.
- In the right-hand middle row insert a text field and
name it password (or whatever you named your password
field). Choose the radio button for the password type.
You can also add a max char in each field to match the
max char in the database, if you like.
- Add a button, and change the label to Log In.
Here is what the table will look like so far.
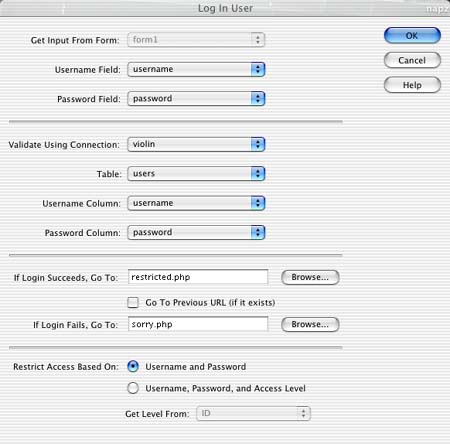
Step 4: Add the new Login Server Behavior
(Note: You do not need to create a recordset query when
you use the login server behavior, but you will need to set
up the connection to your "User" database. Go to the menu
item Window>Databases. Click on the plus sign and choose
MySQL Connection. Fill out the dialog box and navigate to
your "User" database.) Now go to the Server Behavior panel
and drag down from the plus sign and choose User
Authentication>Log In User. A dialog box will appear for
you to fill out.
Dreamweaver MX is pretty smart about finding the correct
data to enter once you choose the connection and table. Make
sure that the username points to the username field in your
database, and that the password points to the password field
in your database.
If the log in succeeds (there is a username and password
to match in your database), the script will send the user to
a members only page that we have named restricted.php. If
the log in fails (typos or not a valid user), the script
sends the visitor to the sorry.php page.
Step 5: Sorry and Restricted Pages
The sorry.php should warn the user that the log in didn't
succeed. There should be two links. One will take the user
back to the log in page to try again, if the failure was
only a typo. The second link will invite the user to sign in
and register as a new member.
The restricted page takes the user to the members-only
pages. There you will place the content that is available
only to registered users. We will discuss the log out
behavior later in this tutorial.
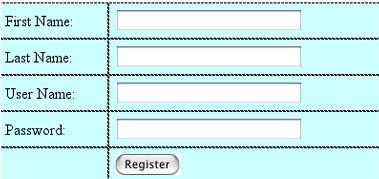
Step 6: Create the registration page
I used a table with 2 columns and 5 rows. Again, make
sure that the names of the fields for each text field object
matches the field in the database. The name of my text field
next to "First Name:" is firstName in the database, so it is
also the name of the text field. I also changed the button
label to "Register"
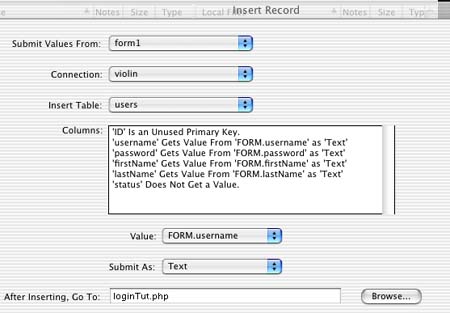
Step 7: Add the Insert Record Server Behavior
After you have created your sign up form and added a
register button, go to the Server Behaviors and choose
Insert Record. Dreamweaver MX does a pretty good job of
filling out the dialog box for you. Check the details after
indicating the connection you want to use, send the user to
the log in page after the record is inserted so that they
can immediately log in and enter the members only section of
the site.
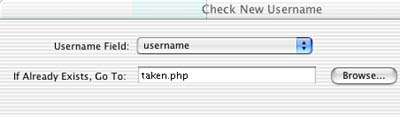
Step 8: Validate the new User name
To prevent users from adding a username that has already
been taken, add the username validation behavior. Go to +
User Authentication>Check New User Name. If the name
already exists, the user goes to the taken.php page where
there will be a message to warn him that the name is not
available. There will also be a link back to the
registration page so that the user can try again.
Step 9: Let the user log out
On the restricted.php page (members only) you can add a
log out behavior. Type the text "Log Out" and highlight the
text. Choose from the Server Behaviors + User
Authentication>Log Out User
Test it out in a browser by adding users and attempting
to log them in and out. Try to enter a user name that's
already in your database to try out the username validation
behavior. As you get comfortable with the steps, you can
expand upon the system by adding an access status field to
your database and using the access level features. That's
it! Soon you'll have true 10-speed power as you decide who
has access to certain areas of your site.
|