|
|
|
|
|
Figure 1 |
Figure 2 |
To make multiple columns in AppleWorks, go to the palette line right under the document title. Look for the "Column" tool (Figure 1). Note that there is a number in the center. The single box to the left means less columns. The double box to the right of the number means more columns. Click the more button a few times to add a few columns, the click the less button until you are left with only two columns.
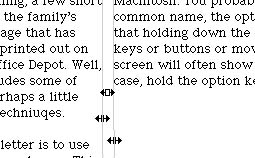
Sometimes you might wan to have columns that are different sizes. One way to do this is to hold down what I like to call the "magic" key on the Macintosh. You probably call it by its more common name, the option key, but I have found that holding down the option key while clicking on keys or buttons or moving my mouse around the screen will often show hidden features. In this case, hold the option key down, then drag the mouse over the gray lines that divide the columns. You will see the cursors shown in Figure 2, but only one at a time. If you click while the first cursor is visible, you will be able to move the columns. The other two cursors are used to make a wider or narrower gap between columns.
|
|
|
|
Figure 3 |
Figure 4 |
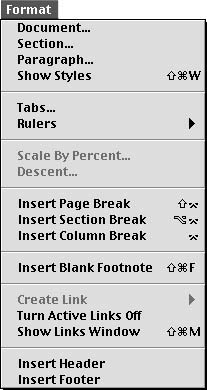
Often, when you are making documents with columns, you want part of the document to cover the entire paper and not just half. The term for that kind of an arrangement is "sections." If you want the first section of the document to be one column wide, and then to have a section that has two columns, you will need to make the first section, then go to the "Format" menu (Figure 3) to choose "Insert Section Break." You will notice that there is a faint gray line across the document window. Place your cursor in the new sections and click the Column tool (Figure 1) to tell AppleWorks how many columns to make. A document can have as many sections as you would like, each with one or more columns.
Sometimes you will want to move the cursor to the second column before the first column is full. Many new users simply press the return key until the cursor is in "right" place. That can really cause messes. Instead, you should use the "Insert Column Break" command in the "Format" menu to move to the next column.
|
|
|
Figure 5 |
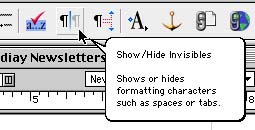
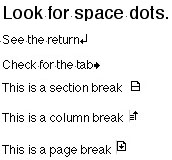
When you are working on documents using these more advanced formatting commands, it is often nice to be able to look behind the scenes to see what is really happening. Each key that you press and each command that you use makes invisible marks that AppleWorks records to format your document correctly. There is a toolbar at the top of the screen that has many buttons on it (and you can and more) to make it easy to use the features of AppleWorks. If you position your mouse over the buttons and pause without pushing the mouse button, balloons will appear to tell you a little about the tool (Figure 4). There is an annoying "bug" in AppleWorks 6 that sometimes makes it difficult to click the buttons in the toolbar. Make sure the button turns gray while you are clicking on it to activate the button. Click the "Hide/Show" Invisibles button, then look at Figure 5 to see the common invisible characters.
|
|
|
Figure 6 |
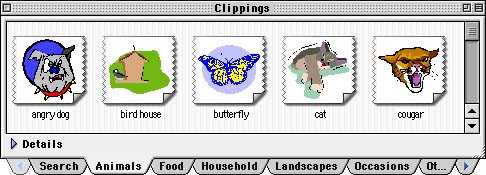
It is often nice to add graphics to your newsletter. In AppleWorks you can see the clip art included in the program by going to the "File" menu. Pull down to the "Show Clippings" command. A tabbed palette, "Clippings" (Figure 6) will open. Explore it by clicking on the tabs and scrolling through the included clip art. There are some great pictures, but you would have thought Apple could have done a better job. Well they did. But, rather than clog your hard drive with thousands of pictures that you only use once year, they put a whole lot more clip art on their servers on the Internet and gave you a great way to download just what you want. Click on the "Search" Tab, enter a word, make sure the "Search Web Content" box is checked, and then click the "Search" button. Your computer will connect to the Internet, contact the AppleWorks servers and show you want it found listed with that key word. If you do not get any results or very few, try a related word. Christmas brought up lots of holly and candles, but not one manger scene. Manger or nativity yielded a few more. Similarly, Hanukkah did not give me any results, but typing in "dreidel," "menorah" and "star of david" returned some nice graphics.
|
|
|
|
|
Figure 7 |
Figure 8 |
Figure 9 |
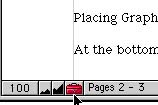
At the bottom of the AppleWorks window is a small red toolbox (Figure 7). Click it to show the tools (Figure 8). If your toolbar does not look like mine, but has two tabs that means that you have not installed the newest updates to AppleWorks. They are usually on our Pi Fillings. Right now, we are working on a new one, so if you want the latest update, go to <http://www.apple.com/appleworks/> and look for the link to the updater.
The four icons at the top of the toolbox allow you to bring in a work processing, spreadsheet, paint, or grid into other documents. The arrow tool is also called the selector tool.
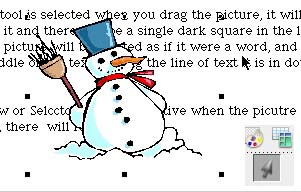
When you are ready to bring a graphic into your word processing document, you can have either the "Text" tool or the "Arrow" tool selected. The easiest way to bring the graphic in is simply to drag it into position.
If the "Text" tool is selected when you drag the picture, it will come in with a box around it and there will be a single dark square in the lower right corner. The picture will be treated as if it were a word, and it will move into the middle of the text, forcing the line of text it is in down the page (Figure 9).
|
|
|
|
Figure 10 |
Figure 11 |
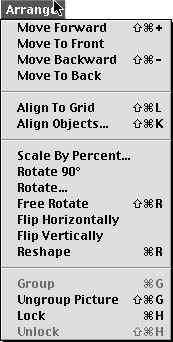
If the "Arrow" or "Selector" tool is active when the picture is dragged onto the page, there will be eight "handles" around the picture and it will "float" on top of the text (Figure 10). If you want to move or resize the picture, click it with the arrow tool and the handles will come back. When the picture is selected, the menu bar changes to reflect the kinds of tool that you would use on pictures. Of particular interest are the "Arrange" and "Options" menus.
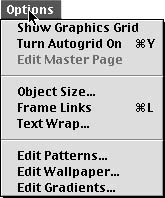
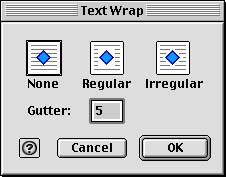
The "Text Wrap..." command in the "Options" menu (Figure 11) can be used to wrap the text around the graphic. Select the graphic, bring up the "Text Wrap..." window and choose how you would like the text to wrap around the picture.
|
|
|
|
|
Figure 12 |
Figure 13 |
Figure 14 |
When the picture is selected, the "Arrange" menu (Figure 13) appears. The "Move Back," and "Move Backward" commands can be used to move the text over the picture (Figure 14).
Photographs can be used as easily as clip art. You will need to use the handles to make them small enough to fit on your pages. If you have any experience with photo editing, it would be a good idea to get them to a smaller size before bringing them into AppleWorks. Unfortunately, that will have to be the topic of a future article.
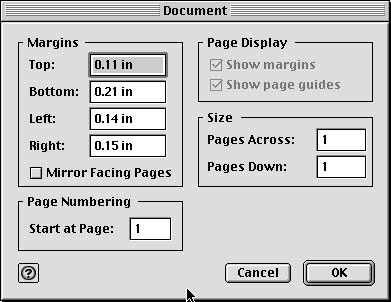
If you are using one of the printed papers with a border design or a graphic, you may need to change the printing margins for your newsletter. This is done in the "Format" menu when the text tool is darkened. Select the "Document" command to make the changes. You will need to consider the minimum margins required by your printer. Read the article on Address Labels in this issue for more information on that topic.
Newsletters that are made using the Draw module of AppleWorks can be more free-form. To Make a "Draw" document, go to the "File" menu and pull down to "New," then out to "Draw." You can also use the "Starting Points" palette or the toolbar at the top of the Appleworks window to start a new "Draw" document.
In draw documents, you use text boxes to hold headlines and areas of text. Each box is independent of the other boxes and can be moved around or resized whenever you want to do so. Clip art and photos are also separate boxes.
The boxes can be arranged, layered, grouped and locked into place. To make a text box, click the "Text" tool, move over to the document window, then click and drag to make a box. Type into the box. When you choose another tool or click outside of the box it is deselected. To work on the box as a whole, click it with the 'Arrow" tool. If you want to change the text, choose the text tool and double click into the test box.
|
|
|
Figure 15 |
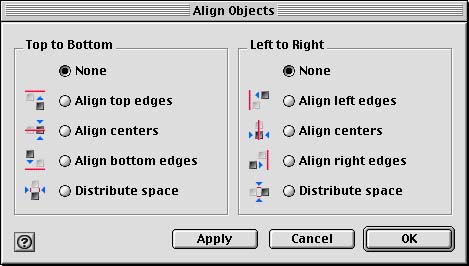
If you want to put text with a picture so that they become one object, click the first object with the arrow tool, hold down the sift key and then click on the other object. When both objects are selected, go to the "Arrange" menu (Figure 13) and select the "Align Objects..." command (Figure 15). After you have them arranged like you want them, go back to the "Arrange" menu and use the "Group" command. If you want one or more object to stay in place, use the "Lock" command. You can group one set of objects, then select that group plus additional objects and make another group.
If your newsletter is longer than one page, go to the "Format" menu and choose "Document." Notice that this window is different from "Document" window in the word processing module. The default document length is one page. You will need to add more pages in this window. Also, the draw module window does not show page margins. To have them show, go to the "Window" menu and select "Page View."
|
|
|
Figure 16 |
Holiday newsletters, at first glance, involve a lot of effort, but just think how much time it takes to write a note to everyone on your list and how boring it gets to write the same thing over and over. Remember how much you like to get photos of people, how much they cost, and then consider how much it will cost to add a couple of photos to your newsletter and print it out on your ink jet printer. I am sure you will get lots of appreciative comments on your efforts, and you have a whole year to plan for next year's letter which will be even more impressive.
We offer classes on making newsletters, working with graphics, and editing photos at Washington Apple Pi. There are also classes on making web pages with the iTools homepage application, making iMovies and making CD's. Just think of the possibilities for next year!
Pat Fauquet is one of the tutorial instructors at Washington Apple Pi. She uses her computer and cameras to make all sorts of interesting projects.