To complete my graduate studies, I wrote a dissertation that was just under 300 pages. The document had a 17 page multiple section beginning, five chapters with 12 tables and 11 figures, 13 appendices, and a bibliography. This document met both American Psychological Association Publication Manual (4th ed.) guidelines and University of Maryland Graduate School Instructions for Preparing Master's Theses & Doctoral Dissertations (http://graduate.umaryland.edu/). Creation of this document occurred between April 1997 and July 1998.
The first computer used in the creation of the document was a Macintosh IIsi with 17 MB RAM running Mac OS 7.5, which was replaced by a Power Computing 100 with 48 MB RAM running Mac OS 8.0. Both machines were attached to various peripherals, particularly an Iomega Zip drive. The first version of the document was created using Microsoft Word 5.1, which was upgraded to Microsoft Word 6.0. The document was completed using Microsoft Word 98. At one point, it was necessary to transfer the document to a Pentium running Windows 95 and Microsoft Word 97.
This journey provided numerous "learning opportunities." Five principal categories of learning opportunities include: 1) document management strategies, 2) importing graphics, 3) creating a table of contents, 4) labeling tables and figures, and 5) pagination. Each version of Microsoft Word provided different strengths and weaknesses in each of these categories.
Putting All Your Eggs in One Basket -- Not
(Lessons: Control the Risk; Do Illustrations Right)
My strategy was to work on one version of the document located on an external hard drive in a folder labeled "97 Dissertation." During a work session, at approximately one hour intervals, I saved a back up copy (using "save as") to an internal hard drive in a folder labeled "Dissertation 97 BU." At completion of the work session, before quitting Word, I saved the revised document (using "save as") in "97 Dissertation" on the external hard drive, and in "Dissertation 97 BU" on the internal hard drive. Copies of both the "97 Dissertation" folder and the "Dissertation 97 BU" folder were then placed (using "drag and drop") on an Iomega Zip 100 disk. During a work session there was a document under revision on the external hard drive, a copy of the revised document no more than one hour old on the internal hard drive, and two copies of the original on the Zip disk.
Early in development of this document, the first three chapters were a single file with about 25 pages of text. Then I added figures created in Microsoft PowerPoint. This greatly increased the size of the document and really slowed down scrolling through the pages. I moved the figures around within the document and ended up with a corrupted file. At this point I decided to change my document management. Using "cut and paste" I created a separate file for each chapter. This cleaned up the corruption problem. I learned to add figures after each chapter was essentially complete, just before the final edit of the chapter. The advantages of separate chapters included keeping the file size within the available RAM, keeping scrolling within a chapter relatively quick, and limiting the amount of damage done if a file was corrupted. The challenge of having separate files for each chapter was in keeping the formatting uniform. I had to make sure the margins, headers, footers, and styles were done the same way. On the final printout, keeping the pages sequential required close attention.
WYSIWYG -- Sometimes
(Lesson: What You See Is What You Get -- WYSIWYG -- as long as you do not use Word's graphics editor for changing figures created in PowerPoint.)
I know Microsoft PowerPoint is not a primary graphics illustration tool. However, I used PowerPoint to create briefs illustrating several of the concepts I used in my dissertation. Since I am "energy challenged" (lazy), I wanted to use the work I had already done rather than starting over from scratch. I used "copy and paste" to move a figure from PowerPoint to Word. As long as I did not try to edit the PowerPoint figure in Word, everything was fine. When I decided to change something within the figure, double clicking on the figure to open it in Word's graphics editor "broke" the text. I ended up recreating the entire figure in the Word graphics editor. In retrospect, for the amount of time I spent on revision of the figure, I probably would have been better off doing a new figure in a robust graphics illustration package and placing the final figure in the Word document. (Yes, I hear Lawrence saying, "I told you so!")
TIF -- TOC
(Lesson: Trouble In Formatting the Table Of Contents)
The good news is that Word will create a Table of Contents. The bad news is that this is not a painless process. In Word 6.0, special coding designates what to include in the Table of Contents. This coding can be "visible" so you know what is marked to be included, or it can be "invisible" so you know how the page will look when it is printed. In Word 98 special coding is not necessary because the designation of what to include in the Table of Contents is handled through style. When I moved from Word 6.0 to Word 98, I went through the document deleting the Word 6.0 special coding and applying the appropriate Word 98 style. Unfortunately, Word 98 had its own formatting for the Table of Contents, which did not match the formatting I required. I created a Table of Contents for each chapter, placing it at the end of the chapter so as not to interfere with pagination. I then reformatted the Table of Contents to meet my requirements. But each time I revised the chapter, I created new headings, so I had to recreate the table of contents and the Word 98 formatting would overwrite my formatting. I ended up creating a Table of Contents with my format at the beginning of the document (a separate file) and manually corrected page numbers based on the Word 98 formatted Table of Contents at the end of each chapter. Then I deleted the end of chapter Table of Contents before the final printout of the document.
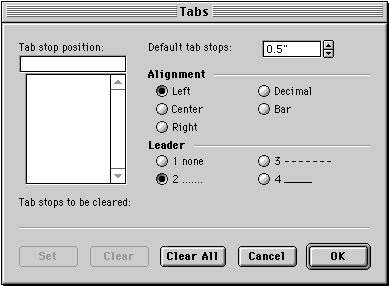
One "trick" in creating the Table of Contents with my format was discovering how to turn on the dotted line between the heading and the page number. I could not find this feature looking through the menu options, but stumbled across it when I had to change the tabs for one of my styles. In Word 98, under the Menu "Format," select "Paragraph" and you will see a window with a button "Tabs" at the bottom left hand corner. Click on "Tabs" and you will see a window with two parts. The lower half of the window is called "Leader" and has radio buttons for different options: none, line of dots, line of dashes, and solid line. Selecting one of the options will put that style line between the heading and the right tab where the page number is located.
 |
|
The Tab window has radio buttons allowing you to select tab leaders, useful for creating a Table of Contents. Naturally, this window is not referenced anywhere in any of the windows dealing with a Table of Contents. |
TIF -- TAF
(Lesson: Trouble In Formatting the Tables And Figures)
The problem of Word 98 "fighting" with the formatting I wanted extended to the labels for tables and figures. I needed two different fonts for the figure labels: the initial part in italics and the rest plain text. Word 98 would do an "automatic update" and change the label to all italics. I turned off the automatic update function by going to the menu heading "Format," option "Style," buttons "New" or "Modify," button "Automatically update." But Word 98 still changed my formatting. Then I went to the menu heading "Format," option "AutoFormat," bottom left button "Options," tab "AutoFormat As You Type," button "Headings" and turned that feature off. At last I was able to make a change in the label and not have Word 98 overwrite the change.
The Challenge of Pagination
(Lessons: Different Formats For Different Sections; Don't Move The Pages Around)
The format required for pagination was complex. The chapters and bibliography were formatted so the first page had the page number centered in the footer, and the following pages had the page number in the upper right hand corner of the header. This required putting a section break at the end of the first page, by positioning the cursor at the end of the text on the first page then going to the Word 98 menu heading "Insert," option "Break," and selecting the radio button "Section Break next page." Because the end of the page was in the middle of a sentence, I had to put a paragraph end at the end of the last line and reformat the first line on the next page so it was not indented.
|
|
|
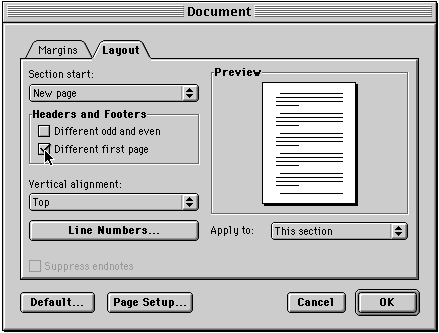
When you want page numbers to appear on different parts of the page in different sections, you won't find how to do this in the Page Number Format window. Instead, divine inspiration is supposed to lead you to the Document window, which seems to be devoted to margins but, in this one case, also deals with page numbers. |
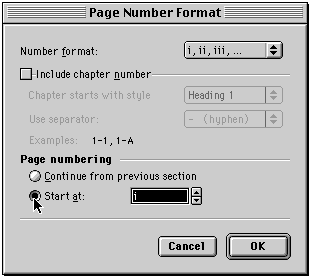
In order to create a different first page I went to the Word 98 menu heading "View," option "Header and Footer," and from the Header and Footer toolbar selected the icon for "Document Layout." Working in the "Document" window, under the tab "Layout," under the section "Headers and Footers," I checked the box for "Different first page" and applied it to "This section." Now that the footer format would apply only to the first page, I went to the Word 98 menu heading "View," option "Header and Footer," and from the Header and Footer toolbar selected the icon for "Format Page Number." This opened the window "Page Number Format," and under the section "Page numbering" I selected the radio button for "Start at" and used the arrow key to select the page number for the first page of that chapter. I formatted the section 1 footer by double clicking on it and selecting the "Center" button from the toolbar. Then using the "Header and Footer" toolbar, I selected the icon for "Insert Page Number." This completed the pagination for the first page of that chapter.
To create the pagination for the following section, I moved the cursor to the second section (the next page) and went to the Word 98 menu heading "View," option "Header and Footer." From the Header and Footer toolbar I selected the icon for "Document Layout." Working in the "Document" window, under the tab "Layout," under the section "Headers and Footers," I removed the check from the box for "Different first page" and applied it to "This section" (section 2). Now that all the pages in section two would be formatted the same, I went to the Word 98 menu heading "View," option "Header and Footer," and from the Header and Footer toolbar selected the icon for "Format Page Number." This opened the window "Page Number Format," and under the section "Page numbering" I selected the radio button for "Continue from previous section." I formatted the section 2 header by double clicking on it and selecting the "Align right" button from the toolbar. Then using the "Header and Footer" toolbar, I selected the icon for "Insert Page Number." This completed the pagination for the rest of that chapter.
The beginning section required Roman Numerals in lower case centered in the footer. To get these I went to the Word 98 menu heading "View," option "Header and Footer," and from the Header and Footer toolbar selected the icon for "Format Page Number." This opened the window "Page Number Format," and under "Number format" I used the arrow keys to select the lower case Roman Numerals.
The problem I encountered in the beginning section occurred when I changed the order of the pages. I could tell where I was within the document by reading the information at the bottom left of the screen, but I could not get a printout of a chosen subset of those pages. I tried using the print command and putting in the page numbers of where they fell within the document, but those were not the pages that printed out. I had to print everything to get the subset pages I wanted.
|
|
|
The Page Number Format window allows you to set the style for page numbers (small Roman numerals, regular Roman numerals, Arabic numbers, etc.). It also controls the numbering sequence: do numbers start over with each section? Are they continued from a previous section? But it doesn't cover where the page number is placed on the page. For that, you go to the Document window, or the Header and Footer window, or possibly several other windows as yet undiscovered. |
Summary
Each version of Microsoft Word provided different strengths and weaknesses. I used Word 5.1 because it was very stable. But I reached a point where some of the complex formatting I needed was not supported. I moved to Word 6.0 to get the Table of Contents and Indexing features. When I had the formatting codes visible, they altered the spacing of the document and I found I was making changes I did not need to make. When I made the formatting codes invisible, I did not catch some of the formatting mistakes until I printed the document. I moved to Word 98 to get rid of the visible formatting codes, but paid the price of trying to find features buried deep within the menus or hidden in windows that I never guessed were relevant. Sometimes I did not understand the order in which I had to make changes, as when I struggled with different pagination for different sections of the document. I was irritated when Word 98 kept changing the formatting and it took a while to figure out how to stop that.
I really like the font Garamond, and used that for my document. This was fine as long as I worked on a machine that had the Garamond font. When I moved the document to a Pentium running Windows 95 and Microsoft Word 97, the font was changed to Times and the spacing changed. Tables and figures were no longer on just one page. This made the document unreadable. If I knew from the onset that I would have to move the document between machines, I would have chosen a font universally available.
I'm glad the journey is over. Now all I have to do is convert the document into HTML so I can post it to a Web site. I'm sure there will be many more lessons to learn.
![]()
Revised Saturday, August 1, 1998 Lawrence I.
Charters
Washington Apple Pi
URL: http://www.wap.org/journal/