

In the last issue of the Washington Apple Pi Journal I began a project to construct a simple check register in REALbasic (RB). The application through Part 1 can be downloaded at:
http://www.wap.org/journal/realbasic/
This contains the RB source code, the compiled Check Register application,
which can be launched with a double click, and the data file needed for the
application to run.
In this installment, I will show you how to add a running balance to your
check register and set up the program so you can write checks.
At the end of the last session I had completed the check register window (called transWindow) and introduced code to read the data file and write that data into the check register, but I had not added a running balance. That will be the first task here in the form of a method called findBalance.
Since it may be necessary to call the findBalance method from some part of the application other than transWindow, I will add a new concept, called a module, to the project. A module is global and can be addressed from any window in the application. A module can only contain methods, properties and constants, and is added by clicking on the Add Module button in the Project window toolbar. Figure 1 shows this button, and the added globalFinancial module (named “financial” in the window in Figure 1), both in the list of windows and in a tab.
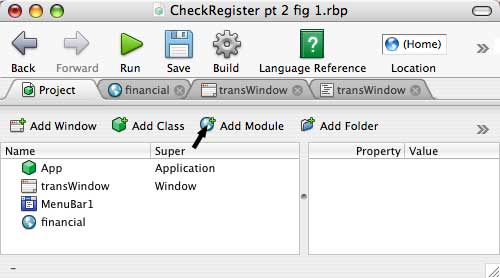
Figure 1: The REALbasic Integrated Development Environment, showing the added module "financial."
I will be using the globalFinancial module to handle arithmetic calculations for the entire application, so I will declare some properties in that module that were previously in transWindow. Specifically, I will declare balance, credit and debit as doubles and ntransactions as an integer. Because of this global declaration, I will remove the earlier declarations of these properties in transWindow.
Finally, then, the findBalance method:
  dim i as Integer

  dim newbal As Double


  for i = 1 to ntransactions - 1  // Execute for every transaction

    balance = StrToVal(transwindow.transList.Cell(i-1,6))  //
    Convert all entries to numbers

    debit = StrToVal(transwindow.transList.Cell(i,4))

    credit = StrToVal(transwindow.transList.Cell(i,5))

    newbal = balance - debit + credit  // Do the arithmetic

    transwindow.transList.Cell(i,6) = Format(newbal, "#,###.00")  //
    Write the new balance

  next


  transwindow.TransList.scrollposition = ntransactions  //Scroll to
  bottom of transList
Notice that within this method the function StrToVal is called to convert the string representation of a number into a double so that it can be used in a calculation. The RB command "val" will do this conversion unless there are commas present in the expression; here, StrToVal accomplishes this task for me, since there are commas in the display:
   // Convert string to double


  dim n As Double

  dim r As  String

  dim i as Integer


  i = inStr(s,chr(44))  //Find comma in string

  If i = 0 then  // No comma here

    n = val(s)

  else  // Comma here; replace it with a null

    s = Replace(s, chr(44), "")

    n = val(s)

  End


  Return n
This function uses the RB command "inStr" to search the string "s" for a comma represented by the ASCII chr(44). If there is no comma in the expression, the value of inStr is zero and "val" can be used to do the conversion. If a comma is present, the RB command "replace" will replace the comma with a null so "val" can still do the conversion. The observant reader will notice that I've only tested for a comma once. This means that, if my bank balance ever goes above $1 million, the StrToVal method will not run correctly. Oh well.
Lastly, in the globalFinancial module I'll declare an integer "nextCkNr" to represent -- surprise -- the number of the next check to be written. I add the following lines to the transWindow addTransRow method.
  // Update nextCkNr

  if Record(1) <> "" then

    if val(Record(1)) >= nextCkNr then nextCkNr = val(Record(1))
+ 1

  End
Now that I've reached the point where I can read in all the checkbook records and display them properly, it's time to add the capability to write a check. For this I'll add a new window, by clicking on the Add Window button in the Project window, which you can see in Figure 1.
The new checkWindow is shown in Figure 2. It has a title bar that says "Write Checks, " and has what look like ordinary labels for “Check Number” and “Balance.” When the finished checkWindow opens, these will display the next check number and the final balance from transWindow. The window also has a listbox, payeeList (shown here as the large blank box in the middle of the window) that will contain a list of all the people to whom I commonly write checks. There are three EditFields, for Date, Pay to and Amount. These are merely spaces where the user will make an entry. The OK button has been designated as the default button and appears in blue just like any Mac OS X default button.
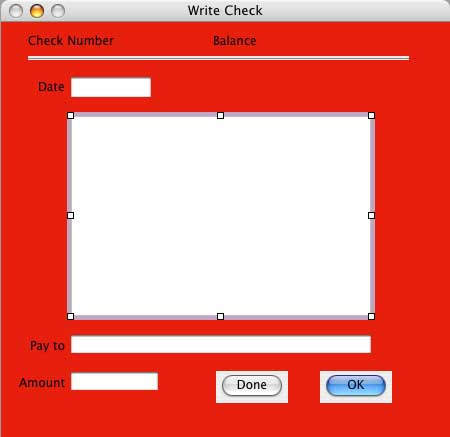
Figure 2: The new checkWindow -- it's created but not yet initialized.
When this window opens, various things must occur to initialize the window so it is ready to be used. Each of the controls in checkWindow has its own Open Event Handler; I will use these handlers to set up each control as desired. If you want to see what checkWindow will look like when I am finished, look at Figure 3.
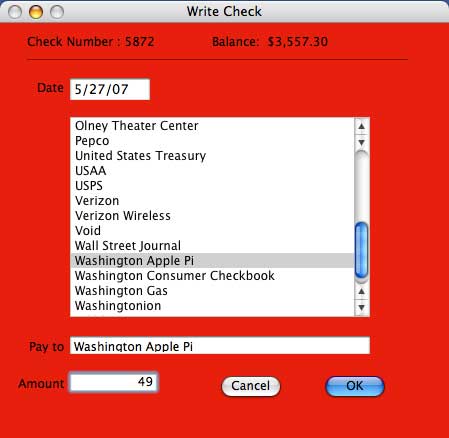
Figure 3: The finished checkWindow -- initialized, and filled in.
First, the text that reads "Check Number":
Me.text = "Check Number : " + str(nextCkNr)
Since nextCkNr is an integer, it must be converted to a string using the command "str" before it is combined with the label.
Next, the text that reads "Balance":
 Me.text = "Balance:  $" + transWindow.transList.Cell(ntransactions
    - 1, 6)
This command looks at the last Balance entry in transWindow, combines it with the label, and displays the Balance readout.
Now the Date EditField is opened. I must digress for a moment to discuss the term Class. In simple terms a class is a control that I've customized by adding some properties and methods to fulfill a specific function. The new control still retains all of the original characteristics, but now has some additional capabilities. If a control is to be used repeatedly in an application, and it should have the same capabilities throughout, then it is a good candidate for a class. In this Check Register application, there will be a number of windows that will require the date to be entered, so I've added a new class, dateEntryClass, and made the Date EditField a member of that class.
The dateEntryClass will do three things:
Here is the Open Event Handler code that will accomplish task 1:
  dim d as date

  d = new date

  me.text = d.shortdate


  me.SelStart = 0

  me.SelLength = Len(me.text)
The date d is instantiated as a new date (d), which automatically gives it the value of the date and time the Edit Box is opened. Then, the text in the Edit Box is set to the shortdate property of d; that is the format "mm/dd/yy" or whatever date format you have set in the International Formats in the System Preferences. The highlighting is set to begin at the zero position of the text with a length equal to the length of the text itself.
Here is the checkEnteredDate method that accomplishes tasks 2 and 3:
  dim d as new date  // A new date is set to the present
      date and time

  dim s As String


  s = me.Text // set to the entered date


  // is entered date missing the year?

  if inStr(3, s, "/") = 0 then  // begin search after the
  3rd character

    s = s + "/" + str(d.Year) // add year

  End


  if ParseDate(s, d) = false then  //format and ck date

    msgBox "That is not a valid date" // Send user
  message

    Return false  // go back and try again

  End

  me.text = d.shortDate  //

  return true
This shows another use of the function inStr but in this case I'm making it begin searching at the third character of the string, so that it ignores the slash between the month and day.
PayeeList
The listbox payeeList will display the names that are commonly used when writing a check. This list, of course, will be unique for every user. The list of names exists as a small text file. Therefore, when payeeList opens, the file must be read and the names inserted into this list box. The procedure is somewhat similar to the reading and displaying of each transaction record that was described in the last article. Here is the payeeList Open Event Handler:
  dim payeeFile As FolderItem

  dim instream As TextInputStream

  dim s As String


  payeeFile = GetFolderItem("Payee Names") // location of Payee
  List


  if payeeFile.exists then  // Make sure file exists

    inStream = payeeFile.openastextFile

    while not instream.eof   // Keep executing until
  end of file

      s = instream.readLine  // Read a line of
  file

      PayeeList.AddRow s  // Add it to PayeeList

      nPayees = nPayees + 1  // Increment counter

    wend

  else

    msgBox "The Payee Names file is missing."

    return

  End

  instream.close  // Close file handler

  PayeeList.Sort
One term in this handler, “nPayees,” does not appear to have been declared. I declared it as a property of the window itself instead of putting it in the handler, because I may have to use it later in another subroutine in this window.
This completes the initialization of checkWindow, but there are a few more subroutines that we need to make the window work as desired. The first subroutine is a simple task that makes the name the user clicks in payeeList appear in the Pay EditField. This subroutine goes in the payeeList CellClick Event Handler.
   Pay.text = me.cell(row, 0)

  ckamount.setfocus
In addition to copying the name, this code also sets the focus in the Amount EditField, so that the user doesn't have to click in that field to enter the check amount.
The only coding for this button simply closes the window:
Self.close
The third subroutine, for the OK button, is the Action Event Handler:
  dim i as integer

  dim s As string


f  if ckDate.checkEnteredDate = false then return


  If Pay.text = "" then

    msgBox "You must enter a Payee"

    Return

  End if


  If ckamount.text = "" and pay.text <> "void" then

    msgBox "You must enter a Check Amount"

    Return

  End if


  //update variables

  Debit = val(ckamount.text)


    // Build record string

  s = ckDate.text + chr(9)

  s = s + str(nextCkNr) + chr(9)

  s = s + chr(9)  // space for check-cleared marker

  s = s + pay.Text + chr(9)  // Payee

  s = s + str(Debit)  // Check amount

  s = s + chr(9) + ""  // Space for credit


  // Update Check Register window

  transWindow.addTransRow(s, ntransactions)

  ntransactions = ntransactions + 1

  findBalance

  listHasChanged = True


  self.close
This subroutine first checks the Date EditField, then the Pay to EditField, then the Amount EditField; if it finds an error, it displays a message and returns to allow the user to try again.
Next it converts the string ckAmount into a double value, Debit. Later in the subroutine you can see that Debit is converted back to a string. What's that about? This sleight of hand allows the user to enter a truncated value as ckAmount -- for example, you enter "49," and it appears as 49.00. See the example in Figure 3.
The next series of steps builds a transaction record in the same form as it is stored in the Checkbook Date file. This allows me to use the same transWindow subroutine, addTransRow, to convert the string and add the data into transList, my check register.
Lastly, some housekeeping:
Figure 4 shows the Check Register window with the latest transaction appended.
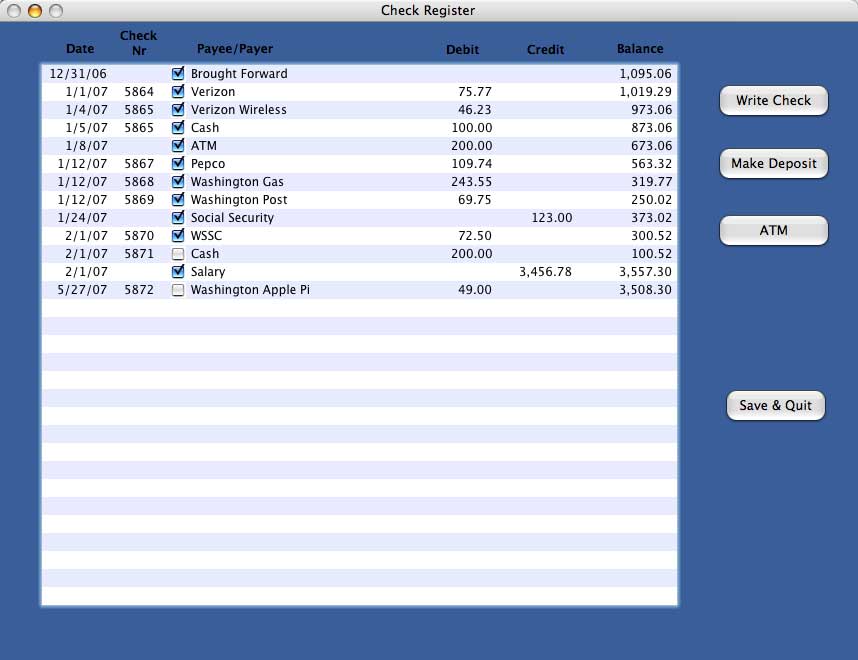
Figure 4: Here is the check register, with the transaction I just entered into the checkWindow that is shown in Figure 3.
You now have a complete check writing window in your Check Register program. You can download the Check Register application folder (labeled "RBCheckRegisterPt2.zip"), as it is built to-date, from:
http://www.wap.org/journal/realbasic/
That folder contains the compiled application, which can be launched with a double-click, the data and payee files and also the RB source file.
In the next installment I will show you how to make a deposit.