

In the May/June issue of Washington Apple Pi Journal, I wrote an article about programming in REALBasic (RB). In the next issue of the Journal I started a series of articles on building a check register using that program, as a concrete illustration of how programming in RB works. This is the third article in that series. Source code and compiled applications can be found on the Pi site at: http://www.wap.org/journal/realbasic/
At the end of the last article I had completed the addition of the window to enter a check. This article will demonstrate how to add: making a deposit, withdrawing from an ATM, saving the check register records, and various application menus.
To add the capability to record deposits, we need a new window. I do this, as you will recall, by going to the Project Window and clicking on the Add Window button to create a new window titled “Make Deposit.” To this I add a listBox, three editFields, two buttons and a few labels. This depositWindow is shown in Figure 1. Beginning at the top, the Date editField is made a member of the dateEntryClass so it will act in the same manner as the Date editField in the check writing window (see Part 2 article).
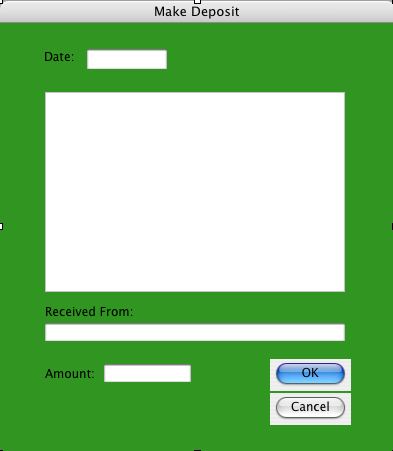
The Make Deposit window
Next, the listBox, depositorsList, will display a list of the people from whom I commonly receive money. Clicking on a name in the listBox will place it in the Received From editField; a new name can be manually entered in that field also. And, as was the case in the checkWindow, when a name is selected in the listBox, the cursor advances to the Amount editField, named depamount so you can easily enter the amount of the deposit.
When the depositWindow opens, this listBox executes its Open Event Handler, below, which reads the depositor file and fills the listBox:
 dim depositorFile As FolderItem

  dim instream As TextInputStream

  dim s As String


  depositorFile = GetFolderItem("Depositor Names") //  Depositors
  List


  if depositorFile.exists then

    inStream = depositorFile.openastextFile

    while not instream.eof

      s = instream.readLine  //read Depositor
  list

      me.AddRow  s

      ndepositors = ndepositors + 1

    wend

  else  // Oops, can't find the file

    msgBox "The Depositor Names file is missing."

    return

  end if

  instream.close
This method is virtually identical to the method I used to populate the checkWindow listBox in Part 2 of this series.
The depositorList CellClick Event Handler gets the following code to make the clicked name appear in the RcvdFm editField and make the cursor shift to the depAmount editField:
  RcvdFm.text = me.cell(row, 0)  // Clicked row, column
      0

  depamount.setfocus
The only subroutine for this button is the Action Event Handler:
  dim i as integer

  dim s As string


  if depDate.checkEnteredDate = false then return


  If RcvdFm.text = "" then

    msgBox "You must enter a Deposit Source"

    Return

  End if


  If depamount.text = "" then

    msgBox "You must enter a Deposit Amount"

    Return

  End if


  // update variables

  Credit = val(depamount.text)


  // Build record string

  s = depDate.text + chr(9) + chr(9) + chr(9)

  s = s + RcvdFm.text + chr(9) + chr(9)

  s = s + str(Credit)


  // Update Check Register window

  transWindow.addTransRow(s, ntransactions)

  ntransactions = ntransactions + 1

  findBalance

  ListHasChanged = True


  self.close
This piece
of code does the following things:
The only function this button needs to perform is to close the window. This small bit of code does that:
self.close
What's left to make this depositWindow work? Well, I need to command it to open, so I will add some code to the Make Deposit button in transWindow. Again, it is only a single command:
DepositWindow.Show
This completes the programming needed so you can record deposits in your check register.
When you make a withdrawal from your checking account using an ATM, the only things you need to record are the date and the amount of the withdrawal. So I'll build a simple window with only two editFields for those two parameters. You can see it in Figure 2.
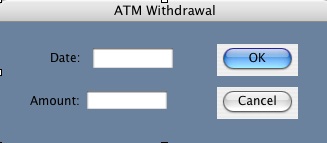
The ATM Withdrawal window
Just as I have done in the checkWindow and the depositWindow, I've made the dateField a member of the dateEntryClass. This pre-loads today's date and will check the date format for accuracy when the user clicks the OK button.
There are only a few tasks to accomplish to record the results of an ATM transaction. Here is the code:
  dim i as integer

  dim s As string


  If Datefield.checkEnteredDate = false then return


  If amount.text = "" then

    msgBox "You must enter an Amount"

    Return

  End


  // Update variables


  Debit = val(amount.text)


  // Build record string

  s = dateField.text + chr(9) + chr(9) + chr(9)

  s = s + "ATM" + chr(9)

  s = s + str(Debit)


  // Update Check Register window

  transWindow.addTransRow(s, ntransactions)

  ntransactions = ntransactions + 1

  findBalance

  listHasChanged = True


  self.close
As you can
see, this verifies that the user has entered a valid and correctly formatted
date, and has entered an amount for the withdrawal. Then, just with the OK
button in depositWindow, I"ve built a record of the withdrawal,
sent it to transList, incremented the transaction counter, recalculated the
balance, set the change flag and closed the window.
Lastly, I add the following to the Action Event Handler of the transWindow atmButton to open the ATM window:
atmWindow.Show
As with depositWindow, the Cancel button merely closes the window.
This last button in transWindow has not yet been coded. Before I do that, I must add some new methods in this window to manage file handling.
If you recall the procedure I used in Part 1 to read the data file and insert each record into transList, it involved two separate methods. The first, readDataFile, opened the file, read the records one at a time and sent each one to addTransRow. The method addTransRow took each record, parsed it, and inserted the various fields into transList. I used this approach so that I could use the addTransRow method every time I wanted to populate transList. You have seen it used for record handling in both the window you use for recording deposits and the window you use for recording ATM withdrawals.
I will use a similar procedure to write the records to disk. First, I'll write a new method, sendTransRow, to extract the fields of a record from transList and prepare them for writing to disk. Another new method, writeDateFile, will count through all the transactions and poll sendTransRow for each transaction, take the result and write that result to disk.
Here is the writeDataFile method:
  // Count through all records on transList,

  // get them formatted by sendTransRow,

  // then write each record to disk


  dim i As Integer

  dim f As FolderItem = GetFolderItem("Checkbook Data") // Pointer
    to file

  // Provide path to write to file

  dim o As TextOutputStream = f.CreateTextFile


  for i = 0 to nTransactions - 1  // Count through all records

    o.WriteLine(sendTransRow(i))  // Write each formatted
    record to disk

  Next


  o.Close  // Close file handler

  listHasChanged = False  // Reset flag
If you look at the method readDataFile in Part 1, this is essentially the same, except that here I'm writing records to a disk rather than reading them from as disk.
And here is sendTransRow:
  // This method recieves a row number (i) then

  // reads that row from transList and formats it.

  // It returns a string record for writing to disk.


  dim record(5) as String  // A six element array

  dim s As String


  debit = strToVal (transList.Cell(i, 4))

  credit = strToVal (transList.Cell(i, 5))


    // Assign each field to an array element

  Record(0) = transList.Cell(i, 1)  // Date

  Record(1) = transList.Cell(i, 2)  // Check Number

  if transList.CellCheck(i, 3) then Record(2) = "x"  //
    Check cleared flag

  Record(3) = transList.Cell(i, 3) // Description (payee/payer)

  Record(4) = str(debit)

  Record(5) = str(credit)

`

  // Unique case of Row 0 -- Balance Forward

  if i = 0 then

    Record(5) = str(strToVal(transList.Cell(i, 6)))  //
    Capture the Balance

  end


  // Convert the array into a string with

  // a tab - chr(9) - as the delimiter.

  s = Join(Record, chr(9))

  Return s
I want to accommodate future additions to the application, so I have added a new method named saveAll. For now, that has only one line of code:
if listHasChanged Then writeDataFile
This tests the flag that has been set to be true every time a change is made to the check register, whether by writing a check, making a deposit, or withdrawing money from an ATM. If the flag is true then the check register is written to the data file. In the future, any other files that have been opened will be tested here in saveAll.
Now that I have a procedure to save the entire check register I can complete the Save & Quit button Action Event Handler with this simple bit of code:
saveAll

    Quit
For those of you who have downloaded and tested the application to date, you've noticed that there is already a Quit menu selection just where it is supposed to be in the application's menu. That's because REALbasic includes that menu item and its functionality with every project. (It also populates the Edit menu, but doesn't include any edit functions.) However, even though all of the necessary commands are included in the four transWindow buttons, I'd like to duplicate those capabilities with menu selections.
I do this by going back to the Project window and double-clicking on the MenuBar. This reveals the Menu window, which is shown in Figure 3. As you can see, I've added the menu "Transactions" and populated it with three menu items and a separator. Each of the menu items has a name and I'll use that name to program the functions of each menu.
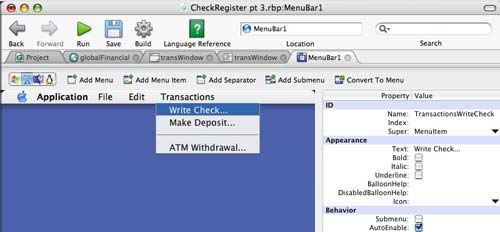
Part of the Menu window showing its Property/Value table
Now, I move back to transWindow and click on the Add Menu Handler button. As you can see in Figure 4, a Menu Handlers menu has been added in the left column along with a popup menu on the right side in which I have selected TransactionsWriteCheck, the Write Check menu selection. Its functions will be coded in the window below and will consist of the same simple code that I wrote for the Write Check button Action Event Handler:
checkWindow.show
In a similar manner I add the Menu Handler for the Make Deposit menu. I click on the Add Menu Handler button, select TransactionsMakeDeposit from the popup menu, and enter the same code that was used for the Deposit button. I follow the same routine to prepare the functions of the ATM menu item.
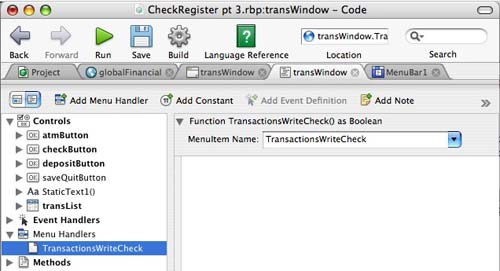
Adding the Write Check Menu Handler
To add the Save and the Save & Quit menu items, I return to the Menu window (Figure 3), click on the File menu to highlight it and click Add Menu Item. In just the same way I added menu items to the Transactions menu, I add the two remaining menu items. Then, returning to transWindow, I add the coding for these items in the same manner as the Transactions menu items.
What happens if I try to Quit the Check Register without saving changes? You are already familiar with the common Mac feature that stops the quit process and issues a query about saving changes. To accomplish this, I first add a method to transWindow named promptSave and define it as a boolean function.
Dim d as New MessageDialog //declare the MessageDialog object
Dim b as MessageDialogButton //for handling the result
If listHasChanged then
d.icon=1 //display warning icon
d.ActionButton.Caption="Save"
d.CancelButton.Visible=True //show
the Cancel button
d.AlternateActionButton.Visible=True //show
the Don't Save button
d.AlternateActionButton.Caption="Dont Save"
d.Message="Do you want to save changes to this document
before closing?"
d.Explanation="If you don't save, your changes will
be lost. "
b=d.ShowModal //display dialog & halt until button
pressed
Select Case b //determine which button was pressed.
Case d.ActionButton
saveAll //user pressed Save so save files
Case d.AlternateActionButton
//user pressed Don't Save
Case d.CancelButton
return(true) //user pressed Cancel
End select
End
This method introduces two new things: the MessageDialog Class and the Select Case statement. You're already familiar with the MessageDialog seen in Figure 5. The comments in the code abov, explain how the MessageDialog is presented and how it operates. The Select Case statement looks at b, which identifies which button has been pressed, and defines what action to take for each case -- that is, each button.
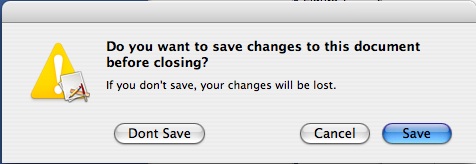
The Cancel-Close Message Dialog
This completes the initial construction of Check Register. At this point you can download and begin to use the application. There are quite a few additional features that will make it really useful. In future articles, I'll show how to add some of these features, including the capability to:
In the meantime, you can download the source code and the compiled application (including the data files) of this version (Part 3) of the Check Register at: http://www.wap.org/journal/realbasic/