

Note: Catalina is a recent release, and over the course of the year some individuals (some evil, most good) will find things that need to be fixed, or tweaked, or nudged. What follows are initial steps to creating a secure MacOS Catalina environment for the average user. Most of these steps apply to previous versions of macOS, too.
A mixture of screenshots were made in both "light" mode and "dark" mode, both to give you a sense of how things look and for variety.
Come back here when you are done.
If you open up System Preferences > Users & Groups, and you have only one account, it is an Admin account. Under the account names on the left, "Admin" (Administrator) accounts say "Admin" under them; Standard accounts say "Standard." All user accounts should be "Standard."
"Why???"
An Admin account has the power to add and delete users, change preferences, and even delete everything on the computer. A Standard user account can only touch things they own, and cannot change global settings.
In 2019, Macs are mostly immune to malware (viruses, worms, and such) unless a user with Admin privileges accidentally or intentionally gives someone else Admin privileges. This is done most often through a PDF (Acrobat) file that contains malware, or a Flash application that contains malware, or in a couple of cases, commercial programs that are essentially malware (such as MacKeeper). If you are an Admin user, the mere act of accepting a file for download to your machine could end up deleting files, setting up and giving someone else administrative control of your computer, or encrypting all your content through ransomware.
In contrast, doing all your work as a Standard user limits the amount of damage. A Standard user, for example, can't delete files belonging to someone else, can't set up a new user on the machine, can't install new applications, can't change critical security preferences, etc. This may seem limiting, but if you set up your computer with an Admin account, but do all of your daily work from a Standard account, you still have full control over your computer — just in appropriately segmented roles.
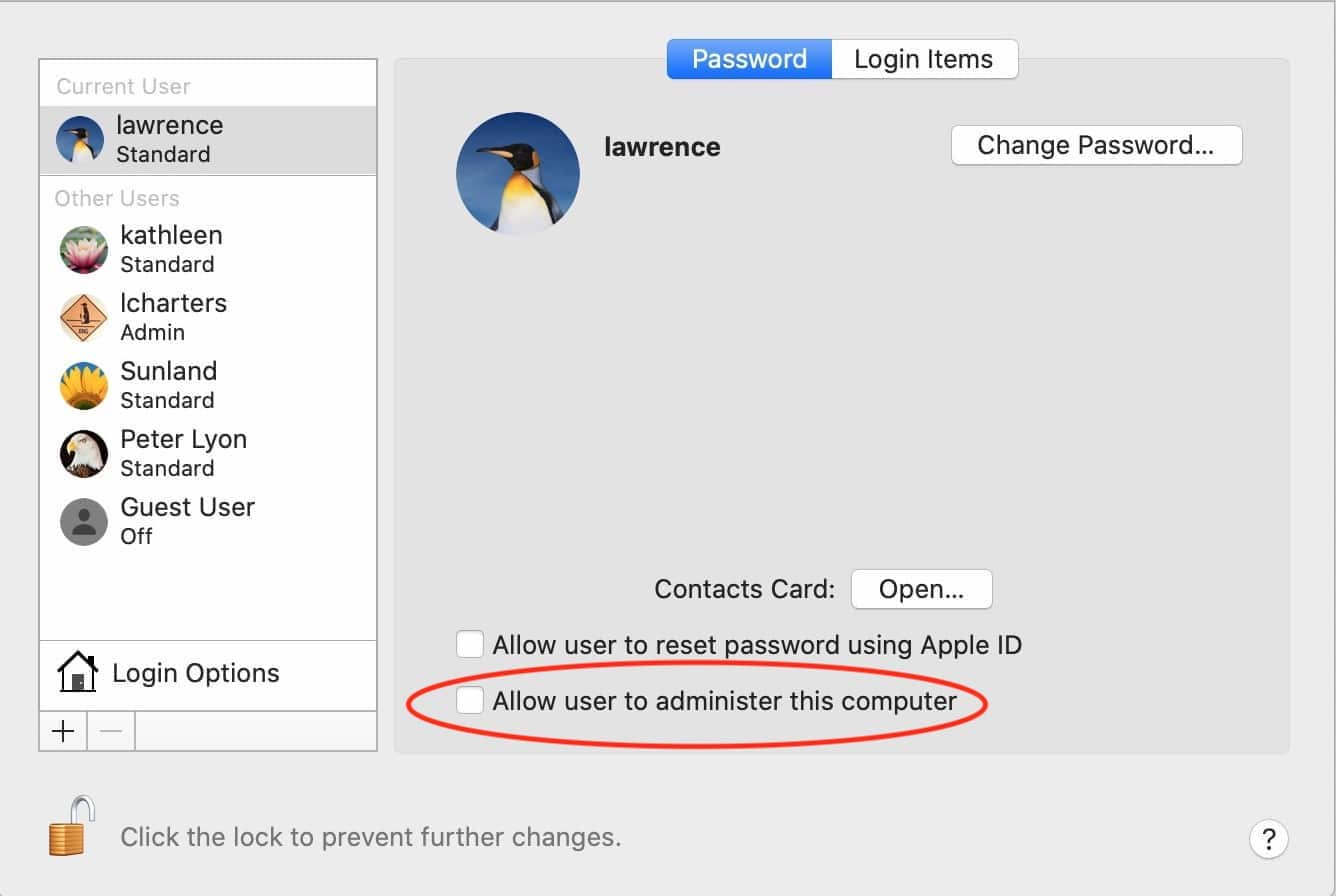
By selecting the checkbox, you can promote a standard user to an admin user. You don't want to do that; all day-to-day work should be done from a standard user account. Click on image for a larger view.
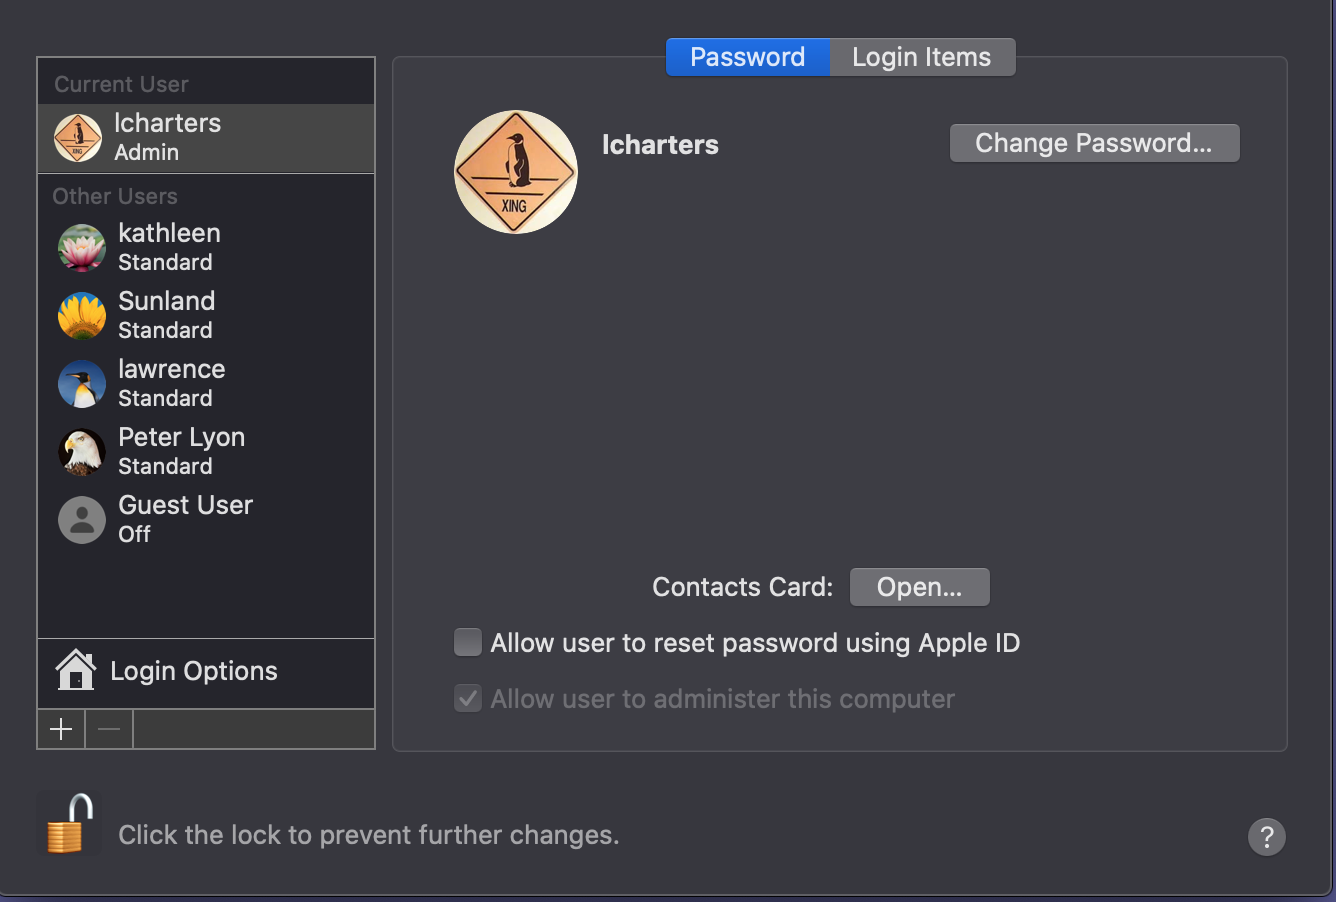
In this example, a computer has a number of Standard user accounts, and one Admin account. All day-to-day work is done in the Standard accounts; the Admin account is only used for special purposes, such as taking screenshots to demonstrate what things look like. In very dim lettering at the bottom center of the page, a box is checked for "Allow user to administer this computer." Click on image for a larger view.
If your machine is currently set up with your account as the only user, you need to set up a new Admin account, and then "demote" your account to a Standard account. To do this:
That's it. You've demoted your regular account.
A vitally important thing to remember: all security controls require an admin user name and password to change. And all security controls apply to all accounts on a machine, both admin users and standard users.
Under System Preferences > Users & Groups:
The options below that can be set anyway you wish, but I recommend leaving them as shown in this illustration:
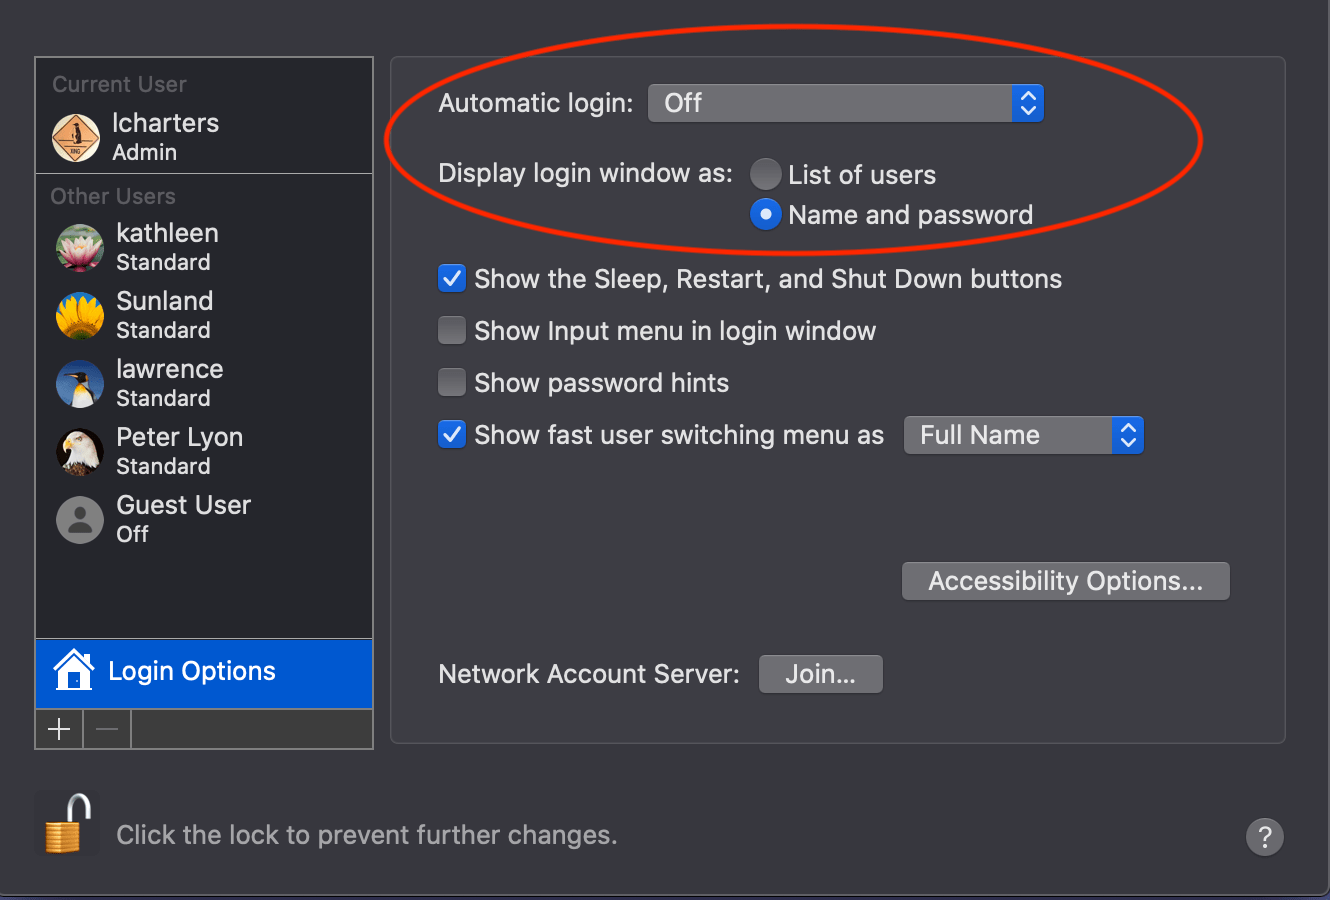
Set login options to prohibit automatic login, and prompt for the user name and password. Click on image for a larger view.
"Why???"
If the users of a machine are not shown on the boot screen, it makes it that much harder to break in, since a hacker (or thief) not only has to guess the password, but also the user name.
Under System Preferences > Security & Privacy:
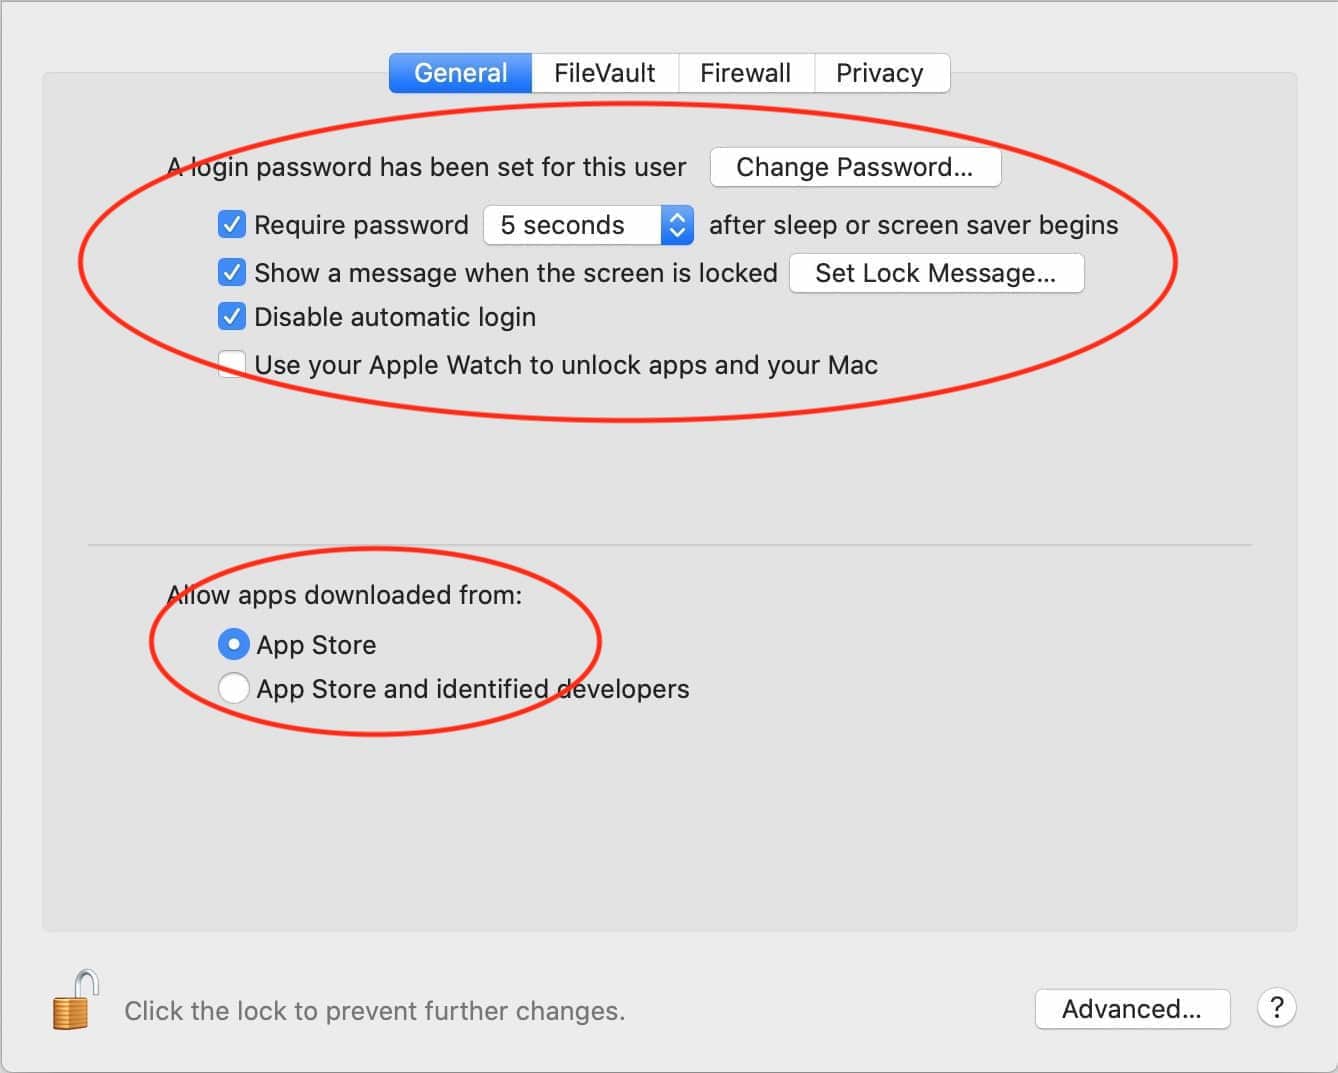
Set your general preferences as shown. If you have an Apple Watch, you can also check the box for allowing your Apple Watch to unlock your Mac. Click on image for a larger view.
Under the FileVault tab, decide if you want to use FileVault. FileVault is recommended for mobile computers, as it encrypts your drive. Even if someone stole the entire computer, they could not see any of your data. The downside: if you do have any kind of disk corruption, it makes recovery much harder.
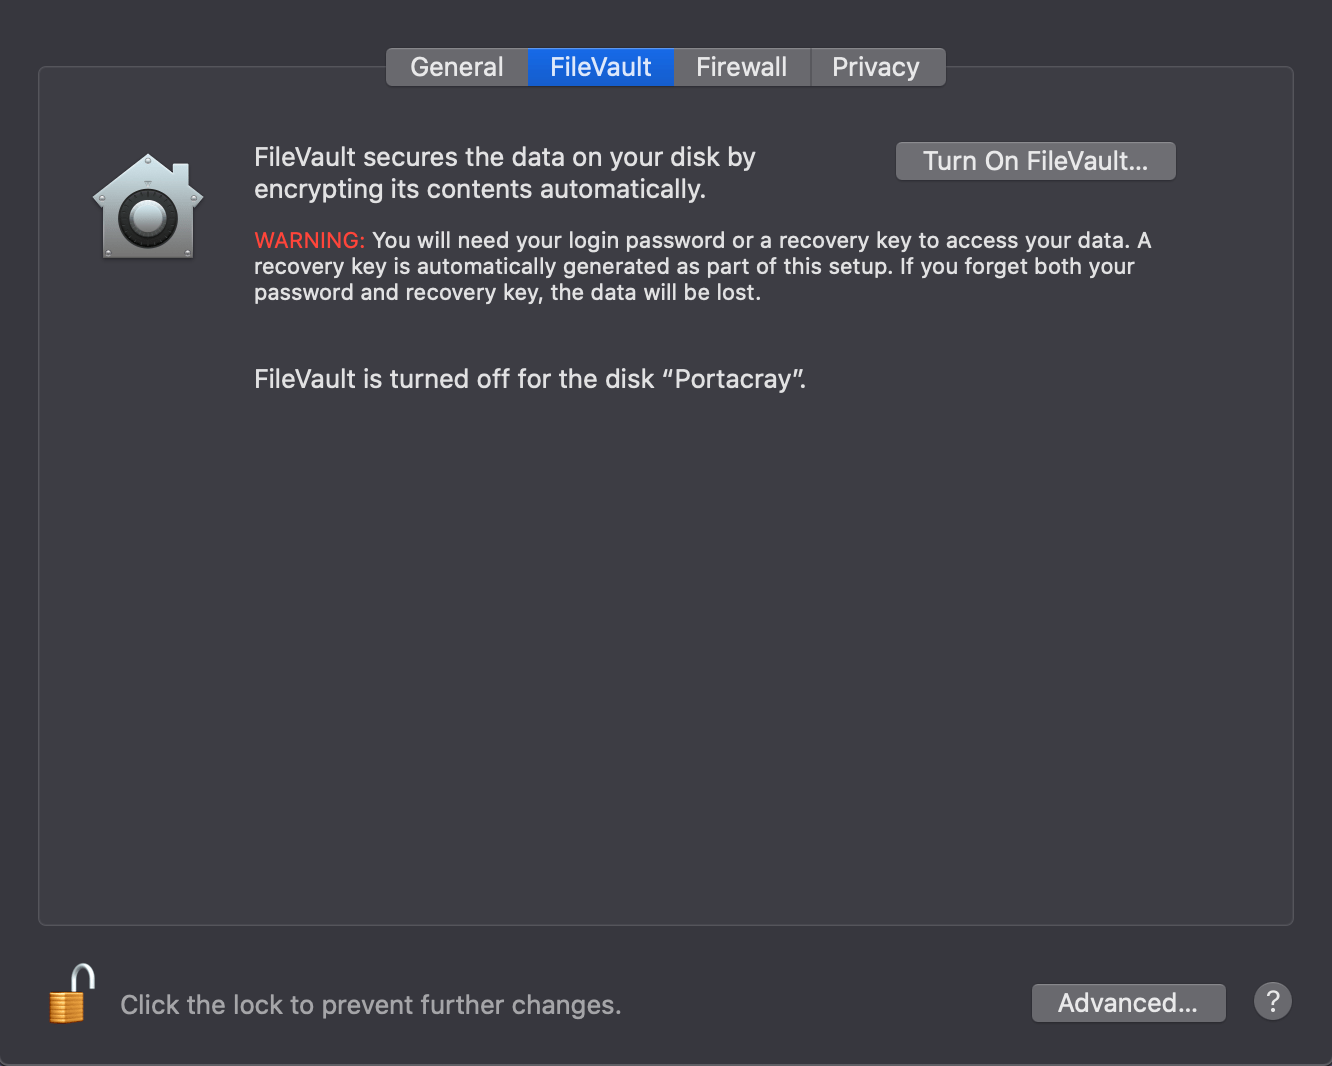
FileVault securely encrypts everything on your hard drive. It takes some time to set up, and you have to remember some security information as otherwise, it will secure your information from you, too.
Under the Firewall tab, make sure the firewall is turned on. There is no sane reason to ever turn it off. If some service technician or alleged genius guru suggests otherwise, find another technician or guru.

Make sure the Mac's firewall is turned on. There is no reason to turn it off. Ever. Click on image for a larger view.
The fourth tab, Privacy, is complicated, and requires an entire configuration document all by itself. It lists major macOS services on the left and then, application by application, allows you to specify which features, if any, that application should be allowed to use. For example, you probably don't want Facebook to have access to your Contacts, Calendars, Camera, Microphone, etc. But it is probably a good idea for Weather to know where you are located.
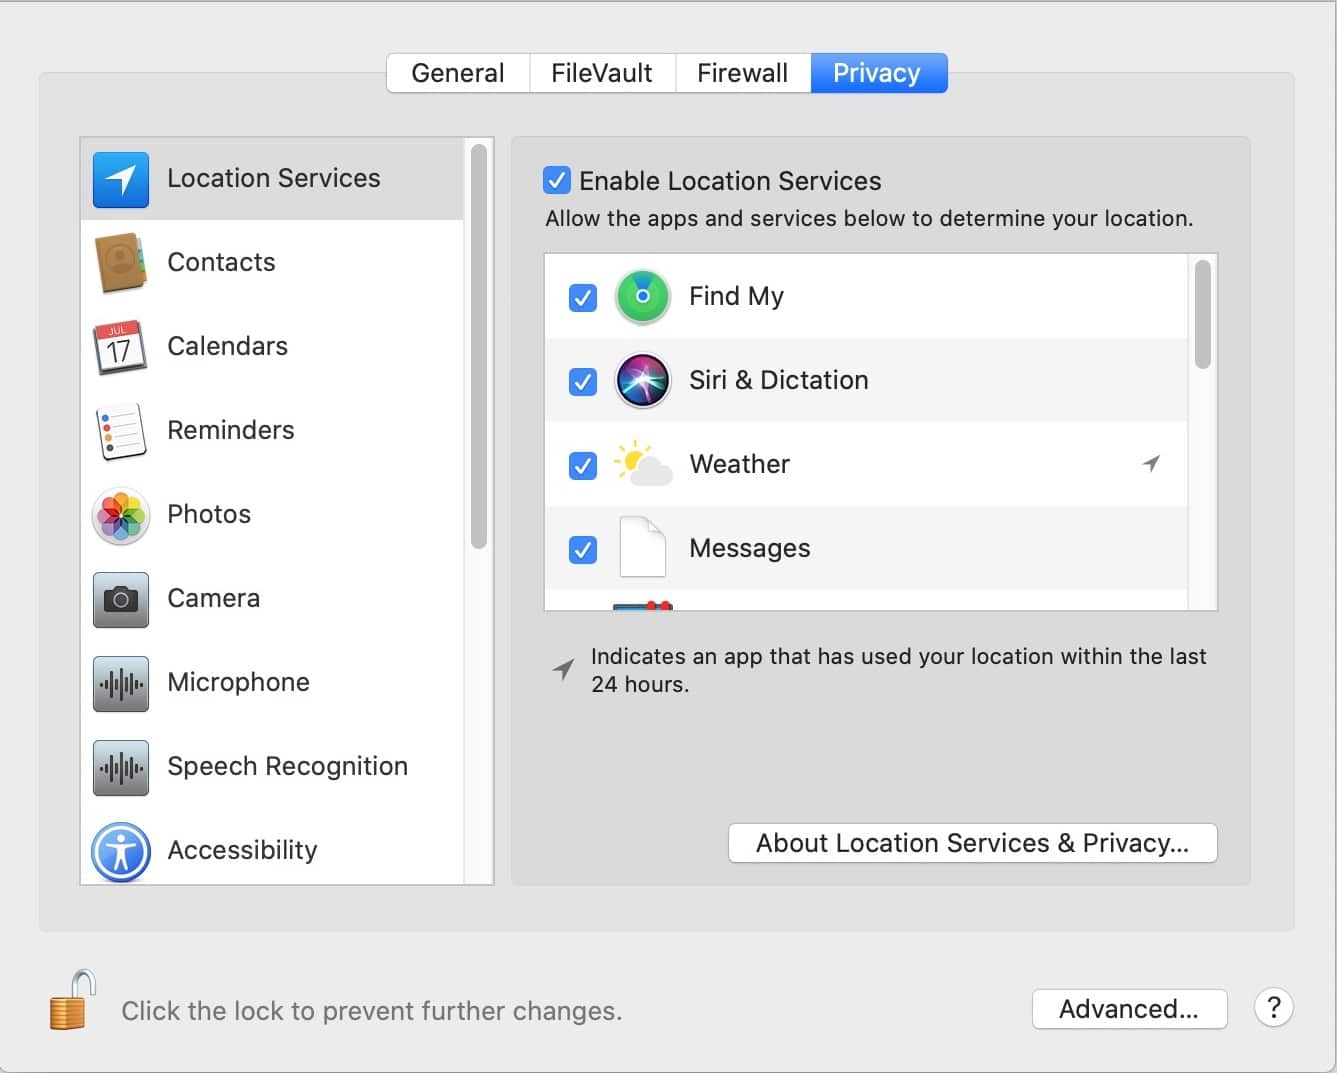
The security tab Privacy settings are complex, and allow you to approve or deny applications access to basic macOS capabilities.
MacOS Catalina has separated operating system updates from application updates. Application updates are still handled by the App Store application in the Applications folder. If it is in your Finder Dock, you will see small, red numbers show up when one or more applications need to be updated. macOS updates now have their own System Preferences control pane, System Preferences > Software Update:
The Software Update System Preference controls how the Mac handles updates to macOS.
If it isn't already checked, check the box labeled "Automatically keep my Mac up to date."
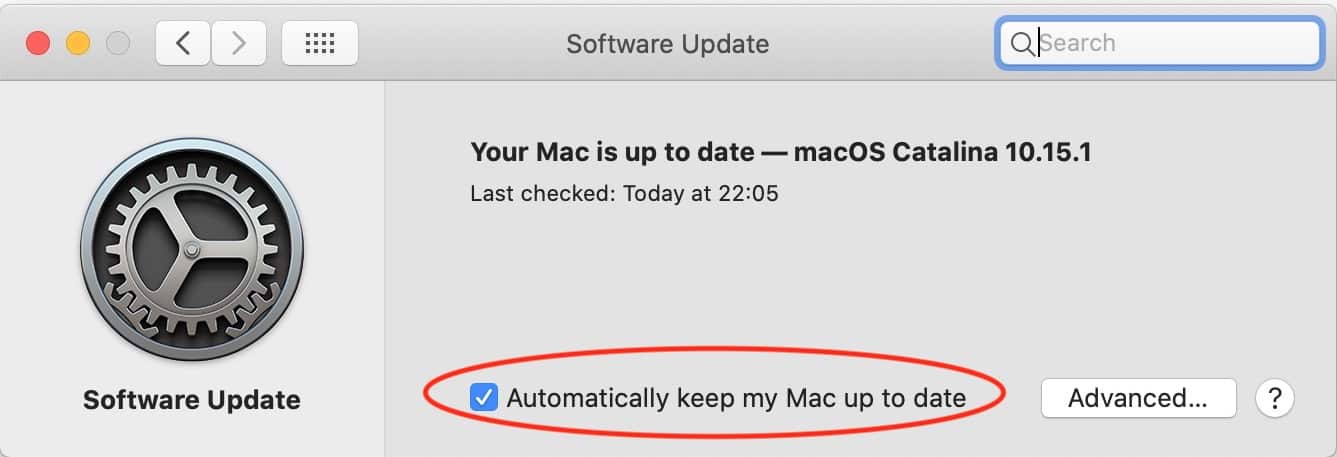
Make sure "Automatically keep my Mac up to date" is checked.
"But wait," you say. "My friend George says I should wait a few days to see if there are incompatibilities with new updates."
This is a very bad idea, and you should tell George to stop giving out computer security advice. Far more machines have been trashed by not getting operating system updates than have ever had serious problems from operating system incompatibilities. Software companies (good ones, at least) are always going to keep their software compatible with the latest system updates. Their development teams have advance access to Apple's operating system updates, and a feedback mechanism to alert Apple to problems with those updates.
Failure to install updates is the leading cause of computer compromises. Leave this box checked.
The Sharing options are one of the most commonly misused features on the Mac. Many users think they need to turn on sharing to transfer files, print, use the Internet, or other options. In reality, these options should usually be turned off. The other problem has to do with network identify. None of these services are required to:
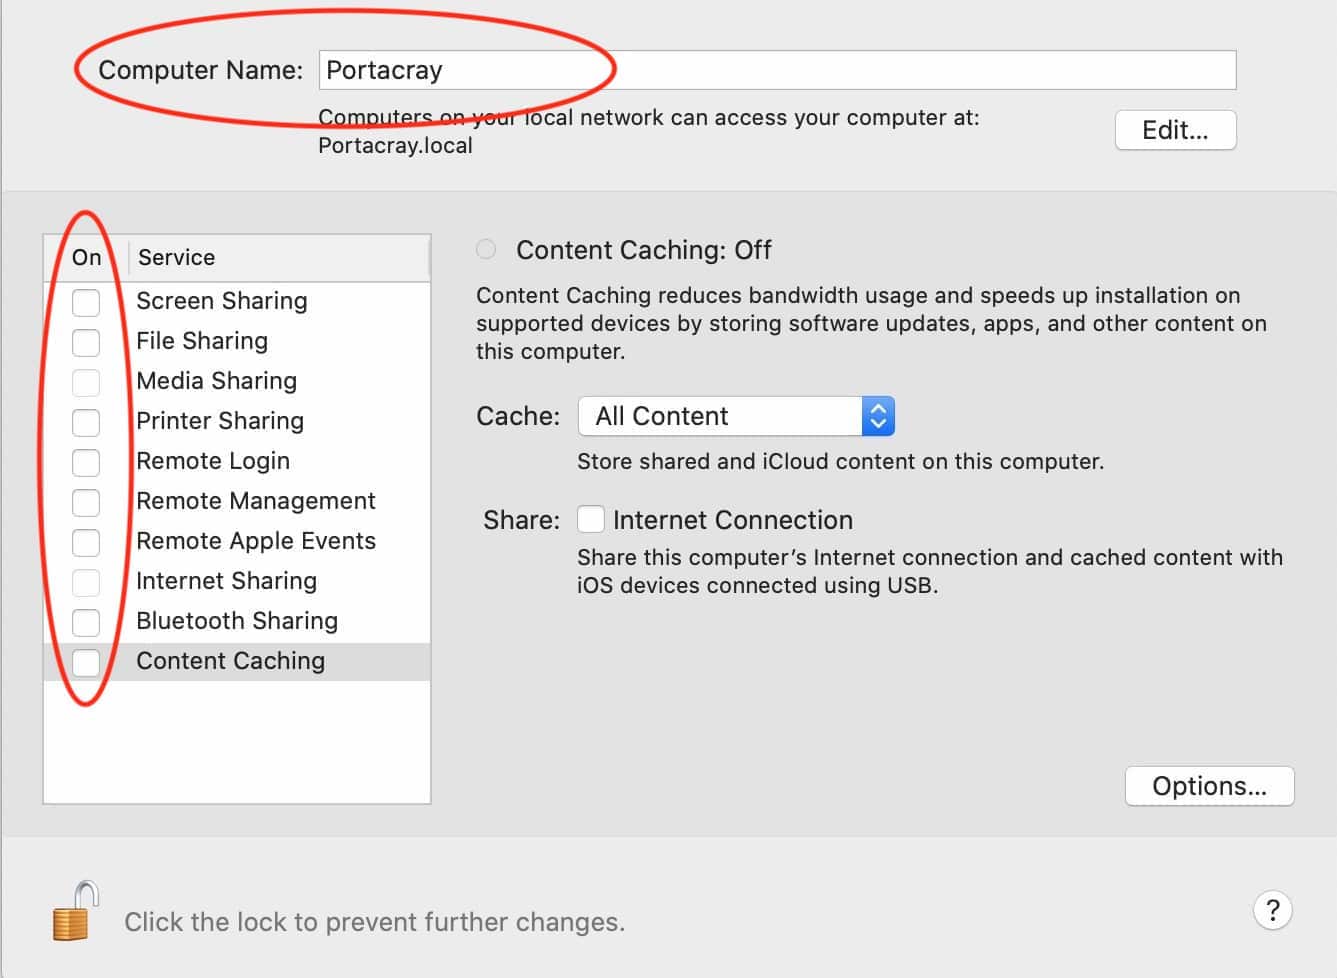
The Sharing preference pane, under most circumstances, should have all services unchecked. Also, a custom name, not identifying the computer or the user, should be used for the computer name. Click on the image for a larger view.
Most of the other options are used for obscure purposes. Screen Sharing is mostly used by network system administrators, as is Remote Login, Remote Management, and Remote Apple Events. Media Sharing, Printer Sharing, Internet Sharing, Bluetooth Sharing, and Content Caching are even more obscure.
File Sharing, if needed to transfer files between two computers, should only be turned on for one of the computers, and immediately turned off when not needed.
One more important item: change the name under Computer Name, at the top. macOS gives your computer a name when the first user first logs into the machine. If Jane logs into a MacBook Pro, macOS will name the computer "Jane's MacBook Pro." This should be changed, as this name is broadcast over the local network. If you use the MacBook in a bookstore or coffee shop, for example, anyone on the network can see that a MacBook Pro is on the network, and that the user is probably named Jane. This is both a privacy issue and, potentially, a security issue.
Your Mac's screen saver options are an important security tool. If you get up from your computer, the screen saver can be set to blank and lock the screen, keeping children, coworkers, and others from seeing what is on your machine, and lock them out of using your machine.
These settings can be found under System Preferences > Desktop & Screen Saver > Screen Saver tab. On the left, you can find a list of possible screen saver options. Below that, you can set when you want the screen saver to turn on (how long the machine should be idle before starting the screen saver). On the right bottom, there is an option to Show with clock (which shows the current time along with whatever the screen saver is doing), and Hot Corners.
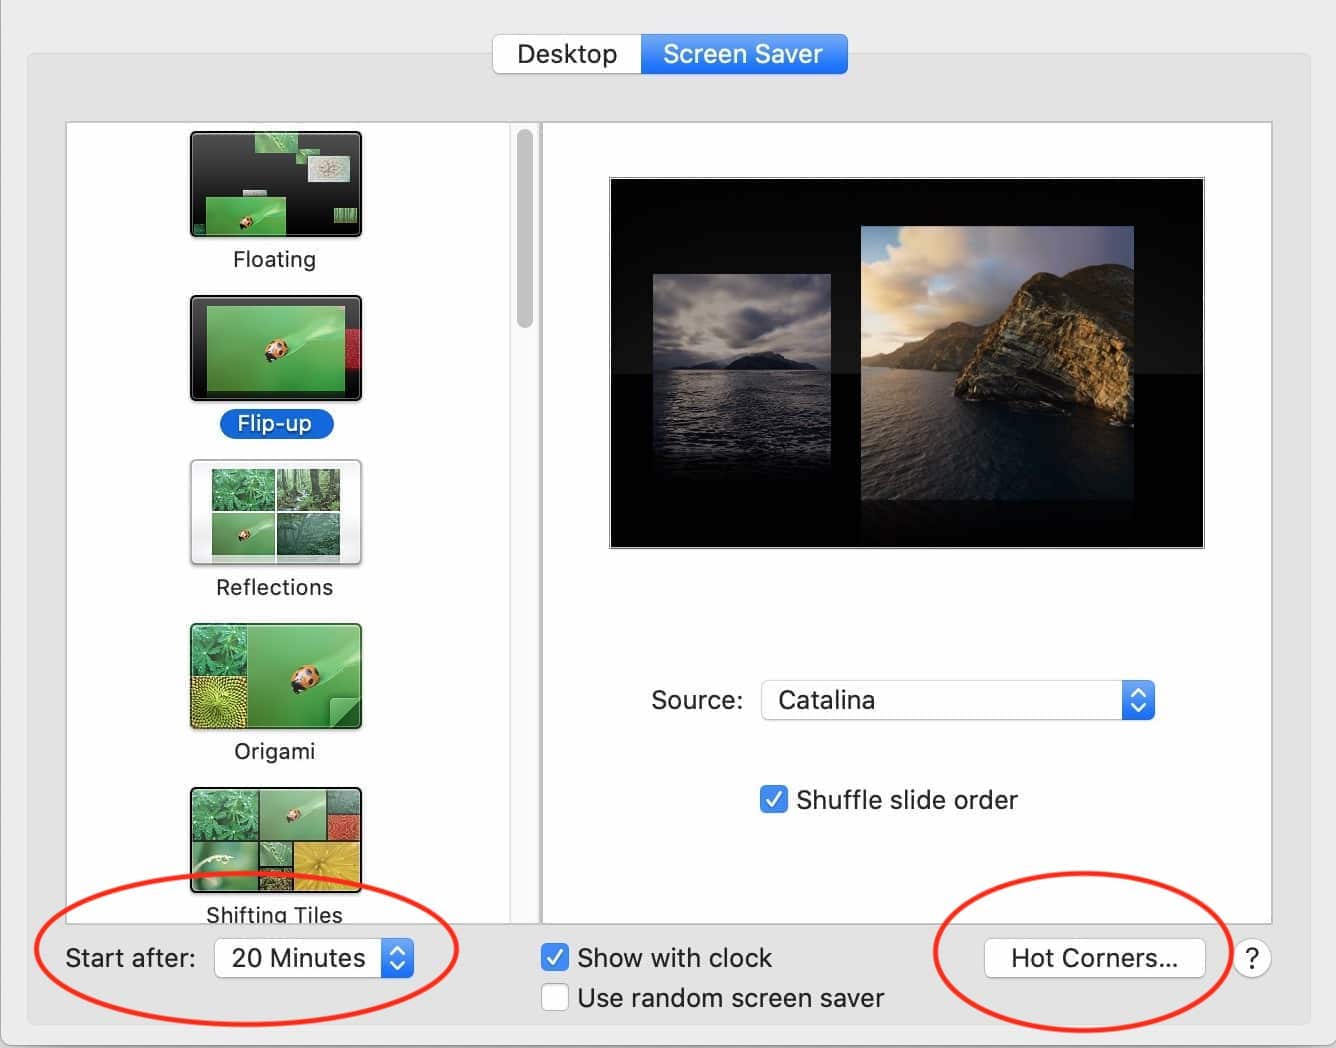
On the bottom left, select how much idle time should expire before the screen saver begins. On the right, select Hot Corners to pick a corner for starting the screen saver manually. Click on image for a larger view.
If you select Hot Corners, you are given the option to start the screen saver manually by moving the mouse into a corner of the screen. It is recommended that you select the bottom left corner to Start Screen Saver.
What this does: by moving the mouse into the bottom right corner, the Screen Saver will blank the screen and start displaying whatever you select as your Screen Saver format. It also will lock the screen, since you previously set the Security & Privacy Settings to "Require password after sleep or screen saver begins."
Working on something confidential and someone comes up behind you? Start up the screen saver. Wander away from your machine? The screen saver will start automatically, after however many minutes you set, and lock the machine.
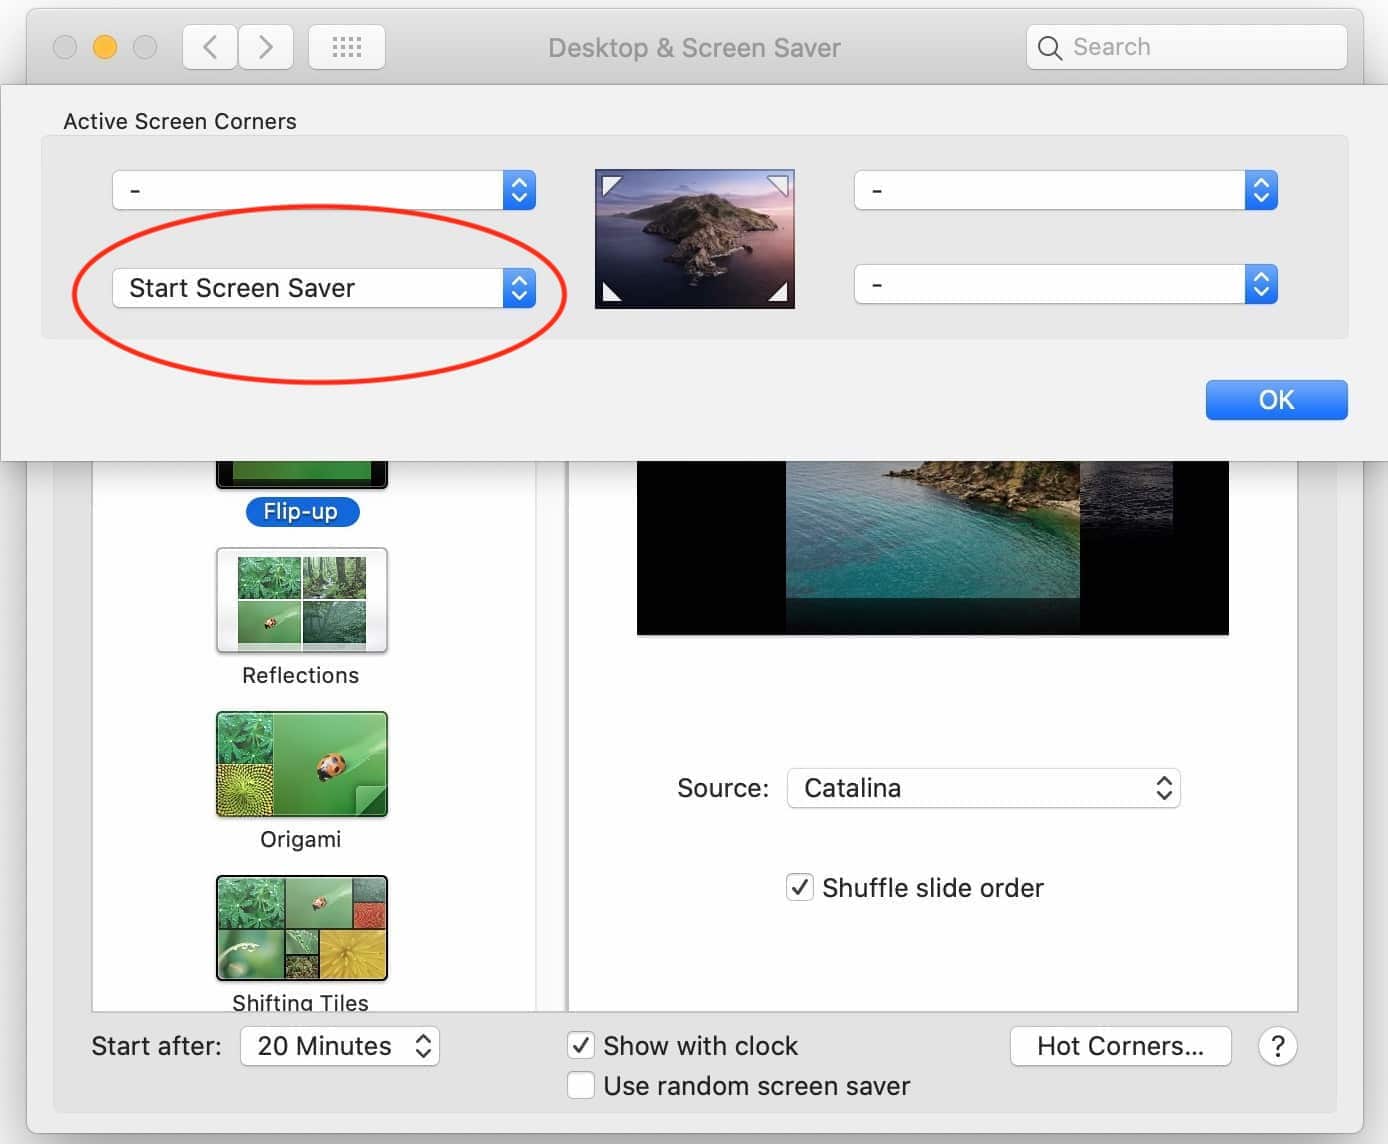
The bottom right corner of the screen has no common use (no trash can, no Notification Manager, no Apple Menu) and is recommended as the Hot Corner to manually start the Screen Saver. Click on image for a larger view.
Extra non-security-related information: the Flurry screen saver uses up a lot of energy, and is not recommended if you are trying to save battery life on a MacBook. The Message screen saver uses the least amount of energy.
And no, on modern computers, Screen Savers do next to nothing to prevent "screen burn-in," which was the original purpose. Modern LCD and LED screens are not inclined to burn-in.
Normally, you use System Preferences > Network to choose how you connect to the Internet or the local network. But the Wi-Fi settings have some important security settings. You want to make sure you don't accidentally connect to the wrong network, or connect to an unknown network by accident.
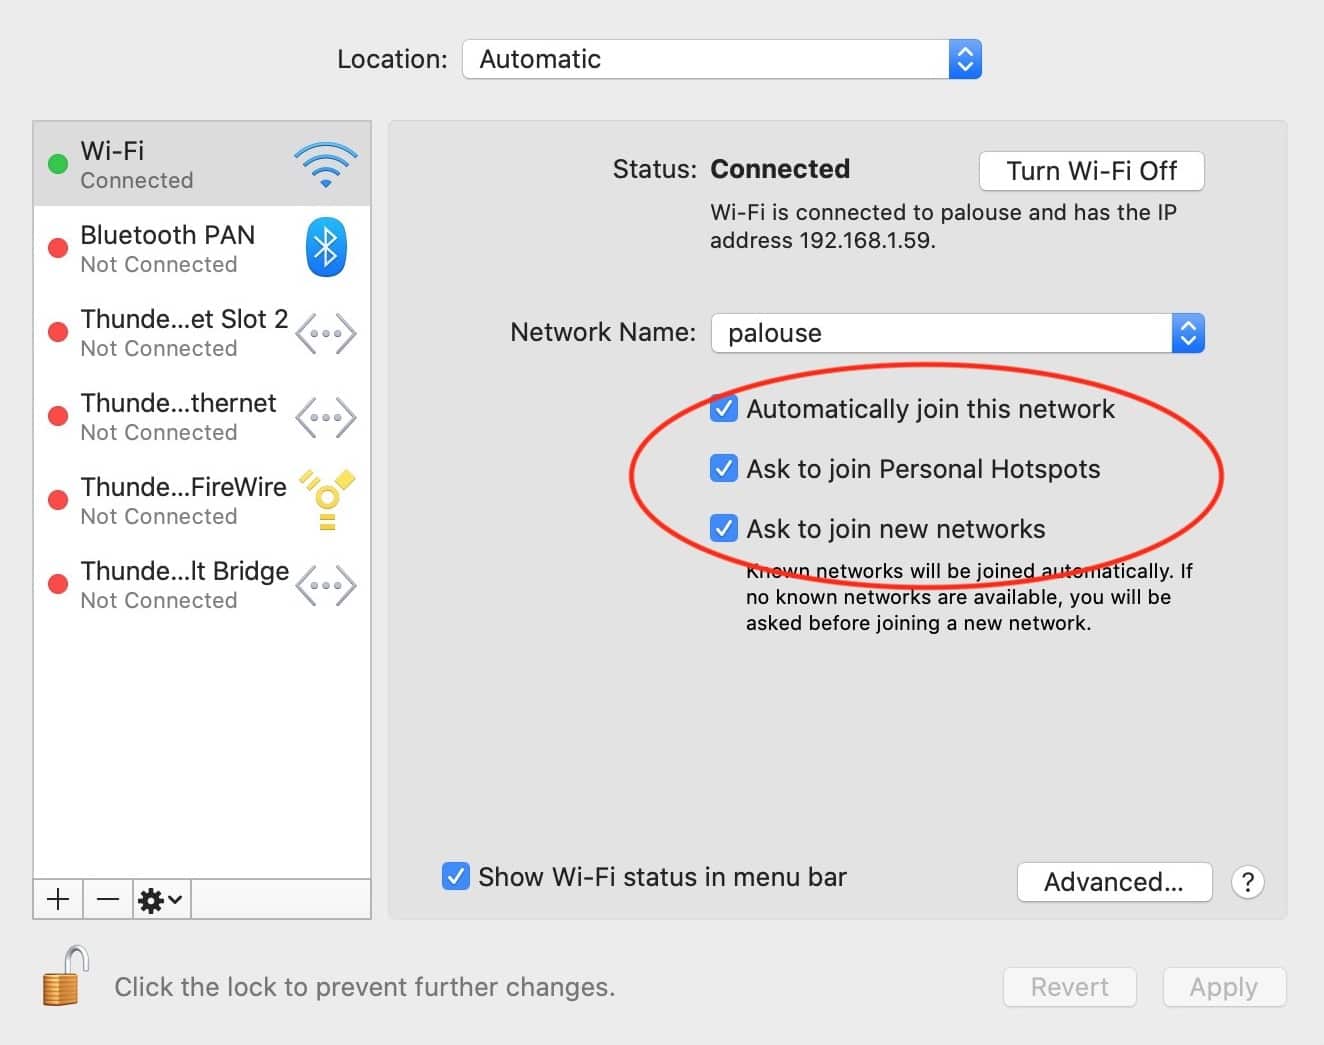
Checking all the options under Wi-Fi ensures that your computer only connects to known networks. The checkbox at the bottom allows you to see the current Wi-Fi status in the menu bar. Click on image for a larger view.
An essential part of securing your Mac is: backing it up. There are several options, one mostly free and others mostly not:
Of these three options, everyone should use Time Machine, and many should probably use iCloud. Some — depending on how valuable your information might be — should also use Backblaze.
Time Machine is easy to use:
Time Machine will take quite a while to back up your computer the very first time, but after that, you probably won't notice. Every hour it will check your machine to see if there is anything new and, if there is, Time Machine will copy it to the Time Machine disk. It does this automatically; you don't need to do anything. In fact, resist all temptation to mess with the settings.
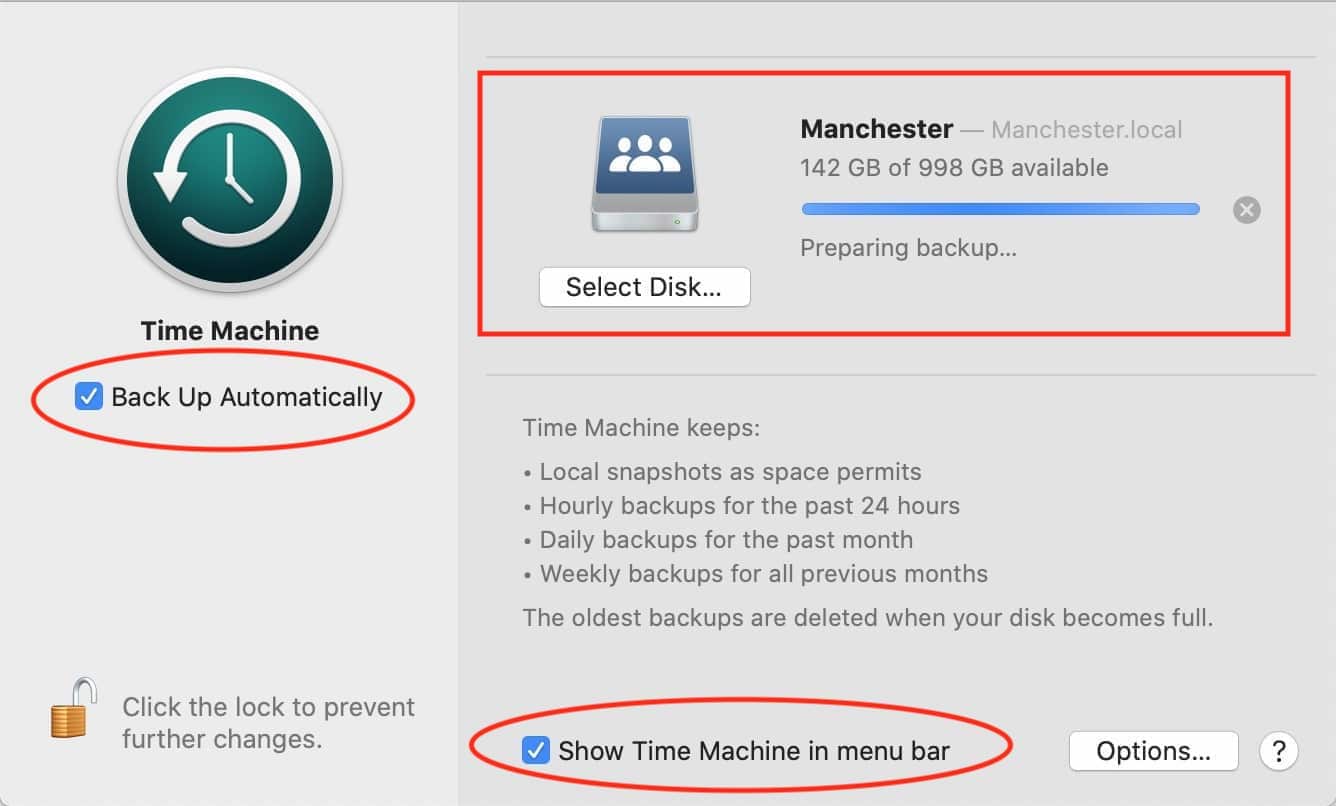
Make sure Time Machine has a disk to use for backup (look in the upper right next to Select Disk; in this case, the selected disk is called Manchester). Make sure that Back Up Automatically is checked. Optionally (but recommended), check the box for Show Time Machine in menu bar. Click on image for a larger view.
System Preferences > General covers a couple settings that are not really security-related, but may help you solve a mystery. At the very top are three thumbnail images named Light, Dark, and Auto. Clicking on Light will give Finder windows a "light" appearance, which is essentially the same thing macOS has been offering since 2001. Clicking Dark switches to the new Dark theme, which is a favorite among photographers, programmers and web designers. Clicking Auto will switch between Light and Dark depending on the time of day.
Farther down is a setting that allows you to set the default web browser. As installed, the default web browser is Apple Safari. But if you wanted to automatically use Google Chrome for websites, select Chrome from the drop-down menu (assuming Chrome is already installed).
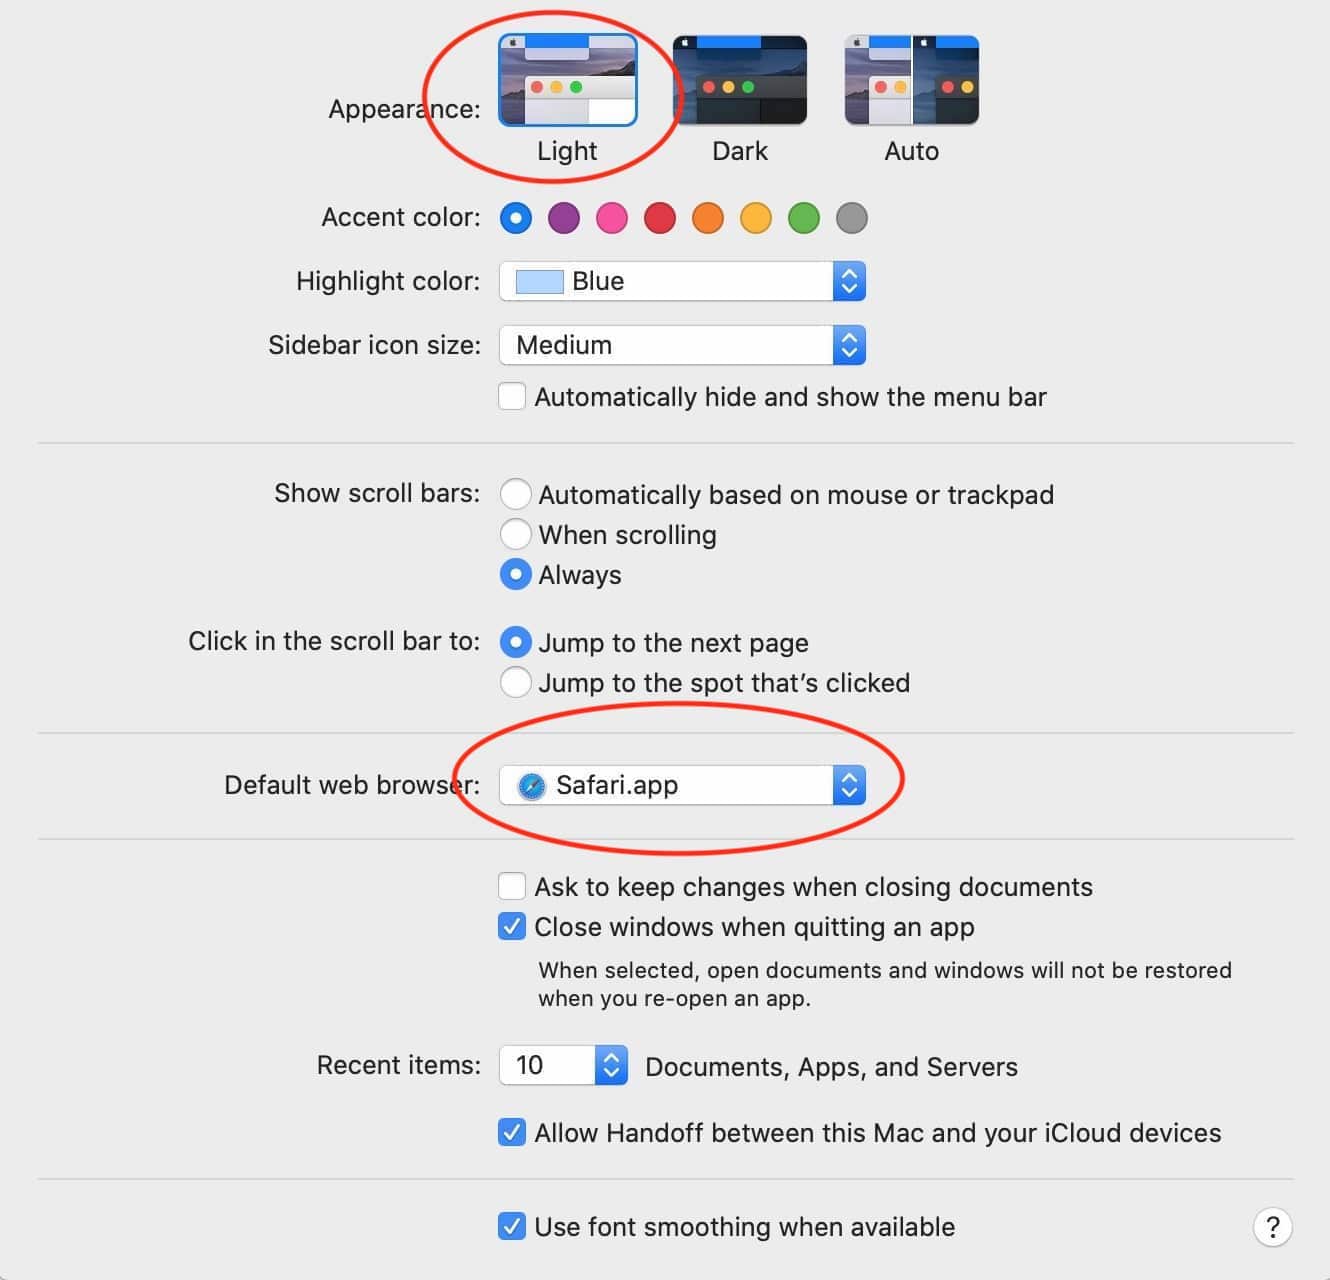
Though it isn't readily obvious, the thumbnails at the top of the General preference pane are buttons that tell macOS that you want a Light theme, a Dark theme, or a theme that switches automatically with night and day. Farther down is a pop-up menu that allows you to select which of the installed web browsers you want to use by default, assuming you have more than one installed. Click on image for a larger view.
Changing Finder Preferences do not make the computer more secure but, rather, increase the awareness of the user to security issues. The least secure part of any computer is the user, so providing the user with all possible help is a good idea.
In the Finder, select Finder > Finder Preferences > General and (recommended) check the boxes for Hard disks; External disks; CDs, DVDs, and iPods; and Connected servers. Why? It will give you a visual indication that a device or volume is available and mounted.
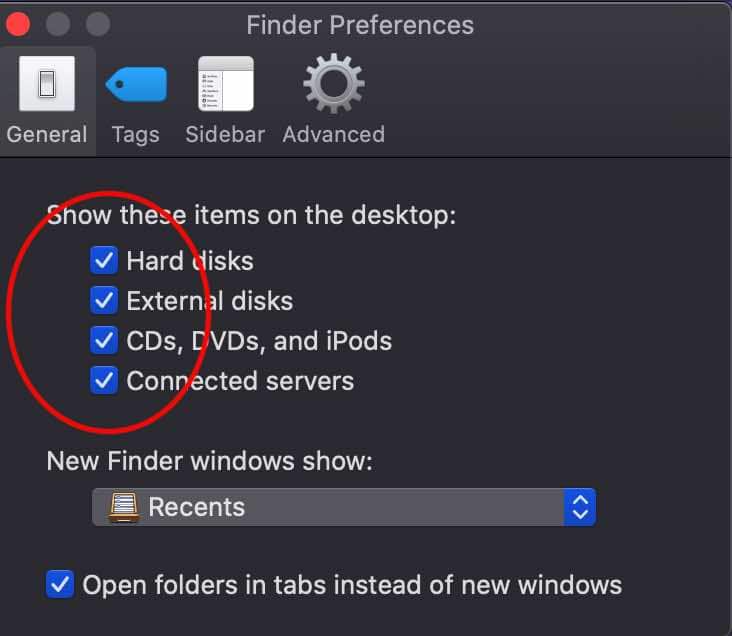
In the Finder, select Finder > Finder Preferences > General and (recommended) check the boxes for Hard disks; External disks; CDs, DVDs, and iPods; and Connected servers. Why? It will give you a visual indication that a device or volume is available and mounted.
For the Tags and Sidebar preferences, select whatever works for you.
Select Finder Preferences > Advanced and (recommended) check the boxes for the first four options:
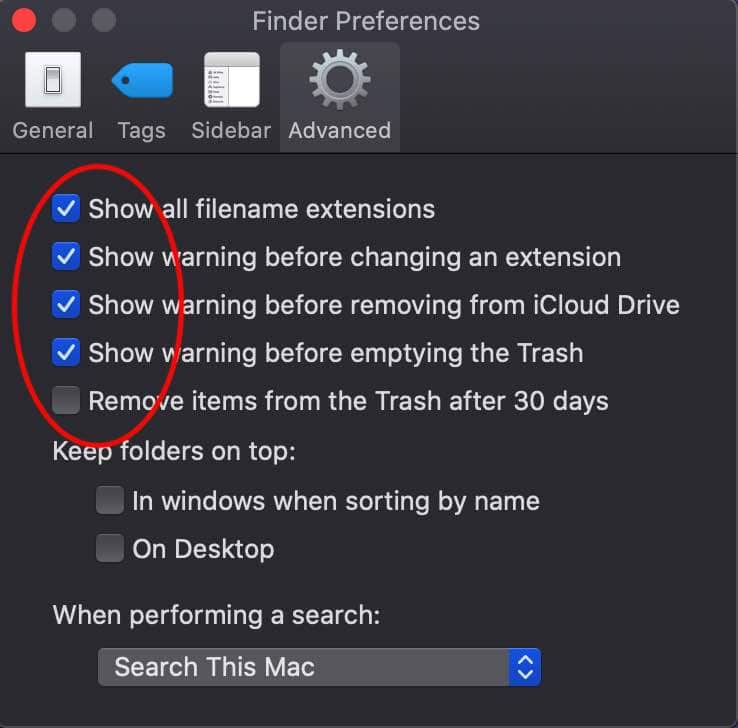
The first four options are recommended to increase the user's security awareness.
One of the most common mistakes people make on computers is setting the wrong time. Many computers are on 24 hours a day; when you aren't using the computer, Time Machine does backups, Spotlight indexes things on the drive, and invisible programs (called "daemons" because computer nerds have a strange sense of humor) do housekeeping chores. Most of these tasks are tied to the clock and calendar, and if you've ever had a 5 p.m. alarm go off at 5 a.m., you have experienced the pain and anguish of a 12-hour clock.
Under System Preferences > Language & Region, you can change languages, or add additional languages. You can also set the time to a 24-hour clock. Most of the world uses a 24-hour clock, which unambiguously allows you to set an alarm for 5 and know that it is 5 a.m. and 17 and know it is 5 p.m. It also helps when looking at log files. If the computer's log file says something happened at 12:59, is that AM or PM? A 24-hour clock makes this unambiguous; you can easily see in this sample log that 12:59:51 is 59 minutes and 51 seconds past noon, and 13:00:08 is 8 seconds past 1 p.m.
Nov 17 12:59:31 Imp bluetoothd[103]: notify name "com.apple.bluetooth.sensorTracking.stateChanged" has been registered 10080 times - this may be a leakNov 17 12:59:51 Imp bluetoothd[103]: notify name "com.apple.bluetooth.sensorTracking.stateChanged" has been registered 10100 times - this may be a leakNov 17 13:00:08 Imp bluetoothd[103]: notify name "com.apple.bluetooth.sensorTracking.stateChanged" has been registered 10120 times - this may be a leakNov 17 13:00:25 Imp bluetoothd[103]: notify name "com.apple.bluetooth.sensorTracking.stateChanged" has been registered 10140 times - this may be a leak

Setting your computer time to a 24-hour clock removes all ambiguity about when alarms go off, actions occur, and when things happen when you aren't watching. Click on image for a larger view.
If this seems somewhat daunting, consider this: the Center for Internet Security guide for securing macOS 10.13 High Sierra is 196 pages long.