

With most of the U.S. population living in urban areas, and a proliferation of street and building lighting, a sky full of stars has become an unfamiliar treat for us. Whereas people living a century ago were often familiar with the star patterns on the sky -- the constellations -- nowadays we usually experience them only during faraway vacations, with no opportunity to learn them, or in planetarium shows. Putting a planetarium on your desktop is a convenient and affordable way to learn to recognize the constellations, so that you can be the one to tell all your fellow travelers, “That’s Scorpio, with the red star in its head!”
Starry Night is one of the best of the desktop planetarium programs. It shows you the appearance of the sky: stars and galaxies, the moon, planets, and artificial satellites, at any time or place you choose. There are three versions: the Backyard version ($50; $35 if you download it) gives you most of the functionality described below; the Basic version ($30) has fewer stars and covers a shorter time period (though it’s adequate for naked eye viewing), while the Pro version ($130) reviewed here adds large star catalogs, a long time period, computer operation for telescopes (if they have the appropriate hardware), access to Internet databases, and other advanced features.
The Starry Night Pro package contains a CD-ROM, a good manual (also provided in PDF form), and a 200+ page book with an introduction to astronomy, including exercises to run on Starry Night.
Although Starry Night can be run from the CD, you should install the program and associated files on your hard disk, both for better performance and to be able to save your settings. The Installer appears on your desktop when you open the Starry Night CD icon; just click as needed. It will deposit about 75 MB on your drive.
Starry Night Pro is not easily figured out without reading the manual if you are new to astronomy or to desktop planetaria. If you have used similar software before, however, you can quickly get to the basic stuff just by looking at the menus. Several palettes can be opened as well, which fit comfortably along the side of your window if you have a resolution of 1024x728. These palette windows offer a quicker way to access most of Starry Night’s features. In fact, the Time window is the only way to set your desired time.
You can get Starry Night to work just playing with it, but several features are likely to be overlooked if you ignore the manual, and many of the buttons in the palettes are hard to understand without a guide. The manual is easy to use, and I recommend at least skimming the subjects to see what you’ve missed.
Here’s how to get started quickly, without reading the manual. In brief, you first set the place and time at which you want to be looking at the sky. From there, you adjust the direction in which you are looking, the field of view, your elevation above the surface, and how often you want updates of the view, as time passes.
When you first open Starry Night, a dialog box will open for you to set your “home location”. Use the Lookup list to select Washington, USA (or any other city you wish to consider as your home base), or add a latitude and longitude of your choice, or just click on a point on the map. (You can change this at any time by going to the Go menu and selecting Set Home Locationº.) If you aren’t interested in seeing your home sky, either choose Go/ Viewing Locationº or click the Location button on the Tool palette (Figure 1). This brings up the same location dialog box you used for your home location. Fill it in as before for your current preferred location. This does not have to be on Earth! There’s a pull-down menu at the upper left of the dialog box that lets you “stand on” any planet or moon in the solar system, or farther yet. This means you can put yourself on the moon and watch the moon’s shadow sweep across the earth during a total eclipse of the sun. To get back home fast, click on the button with the house in the Tool palette, (or use the Go menu).
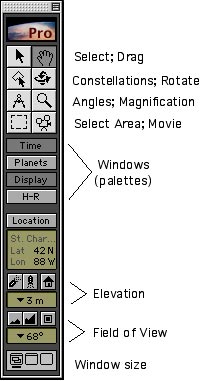
Figure 1: The Tool Palette
After setting your location, you work in the Time window (Figure 2). You can set the date and time you want (click on each item you want to change and type in a new value, or use the arrows). You can always jump back to the present by clicking the button marked “Now”. (Be sure your Mac has the correct time set. Use the Date/Time control panel to adjust it if necessary.) You set the frame rate (the time step between successive updates of the sky) in the upper left, from 1 second to many years, and run the updates with the VCR-like controls on the lower right. The button with the right-arrow (the Forward button) updates the sky as fast as your computer can calculate the new positions; the next one updates the sky in “real time”; the right-most button advances the sky by one time step each time you click it. The button with the small square stops the updates; the left two buttons run time backwards. I recommend leaving the “daylight” setting on (from the Sky menu, or the Display panel), giving you a blue sky during the daytime, fading appropriately into twilight.
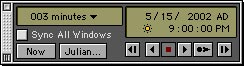
Figure 2: The Time Window
The default view direction is looking south, with a field of view of 110∞, so you see from a bit east of southeast to a bit west of southwest. To look westward, use the scroll bars, or click the button in the Tool palette with the hand on it, then drag the view to the right. You can drag up and down also, to look further up or further down (when you look straight down, you see a pair of shoes at the bottom of the window).
You can also set your altitude. The default is 3 meters, but clicking on the “rocket” button lets you rise to any altitude you wish, even out of the solar system.
When this is all done, you will see something like Figure 3. This shows the sky from my home in St. Charles, IL at 9:00 PM on 14 May 2002. I’ve added planet labels and also labeled one constellation in the basic display.
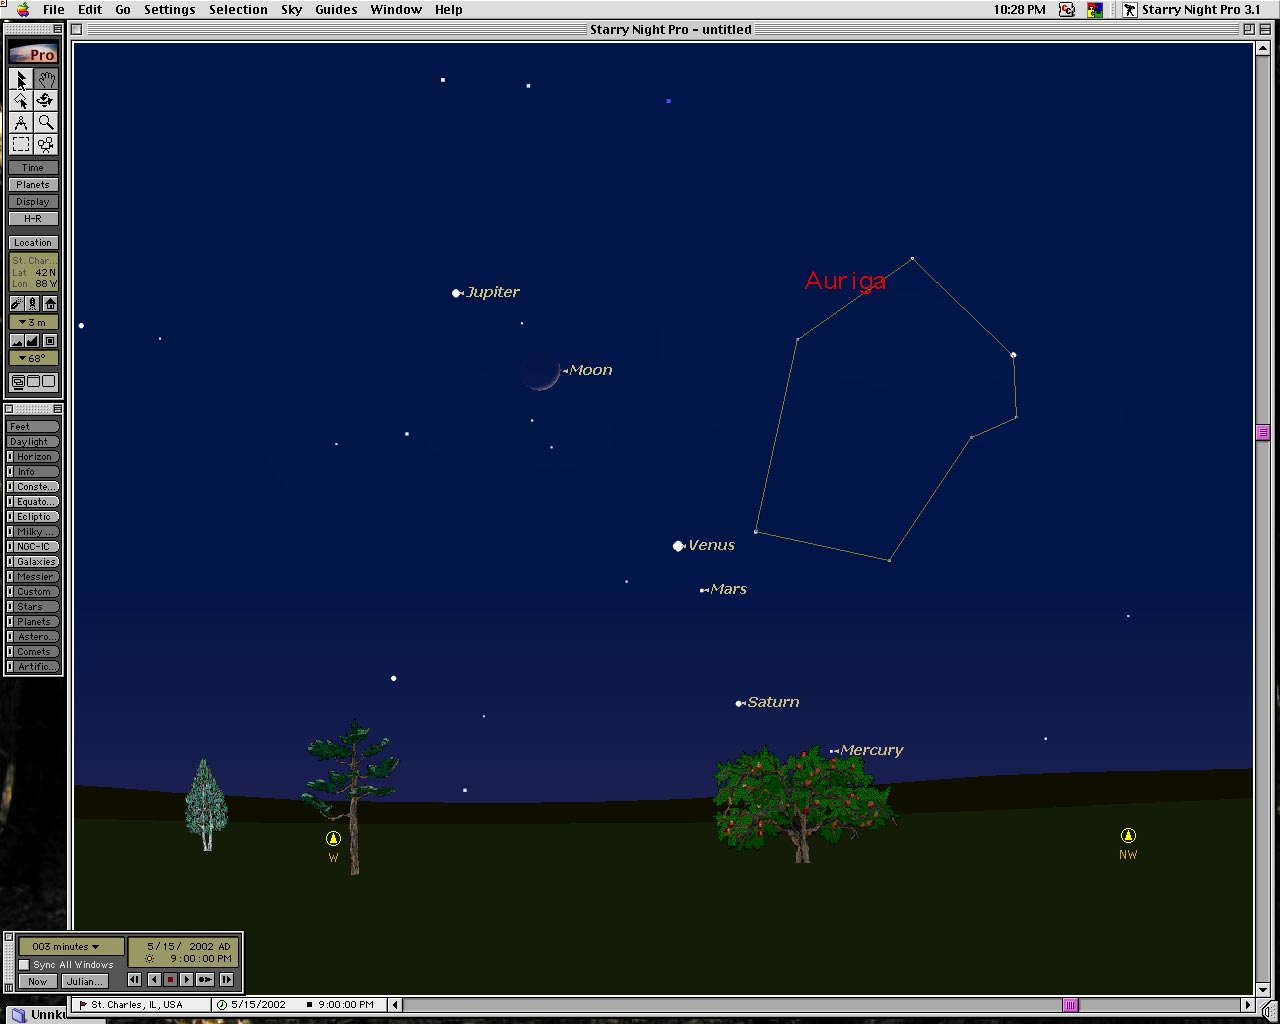
Figure 3: The Starry Night windows fill your monitor screen. This shows my monitor screen for 15 May 2002, at 9 PM, looking west from my home location.
Starry Night has a palette just for the planets, their moons, asteroids, etc.. Double-clicking on a name in this window centers the planet in the current field of view. You can “lock” it in place (i.e., keep it centered), and display its orbit and its apparent path on the sky. You can also use this palette to go to the planet (switch your location to it).
You can zoom in to see just a small part of the sky, enlarged, in at least four ways. 1) You can click the magnifying glass button on the Tool palette and then either drag out a rectangle for the part of the sky you want or click in the area of interest. 2) You can select the field of view from a pull-down menu on the Tool palette. 4) You can use the Field of View buttons on the Tool palette. 3) You can use the contextual menus, by control-clicking on an object and selecting Magnify. (You can also Go There, a dizzying effect, which often ends up with a nice photo of the object.)
The contextual menu, which you get by control-clicking on an object, also give you access to additional information, including photos of the object in question.
You can look at any named object you want (e.g., a planet, a star, a nebula) from the Selection menu (Find…).
You can move rapidly through time, by setting your starting time and place, adjusting the time step to months or years, and clicking the Forward button. You can make a movie of this, and save the movie to play again. For example, you can trace the position of a planet on the sky over several years.
There’s a list of special events, mostly eclipses (Figure 4), which you can access from Sky/Interesting Eventsº, and with Starry Night Pro, you can access the SPACE.com web page to tell you what is worth seeing that very night. You can open multiple windows and synchronize them to get several views of the same event. Watching an eclipse from the moon and earth simultaneously gives a wonderful feeling for what’s going on.
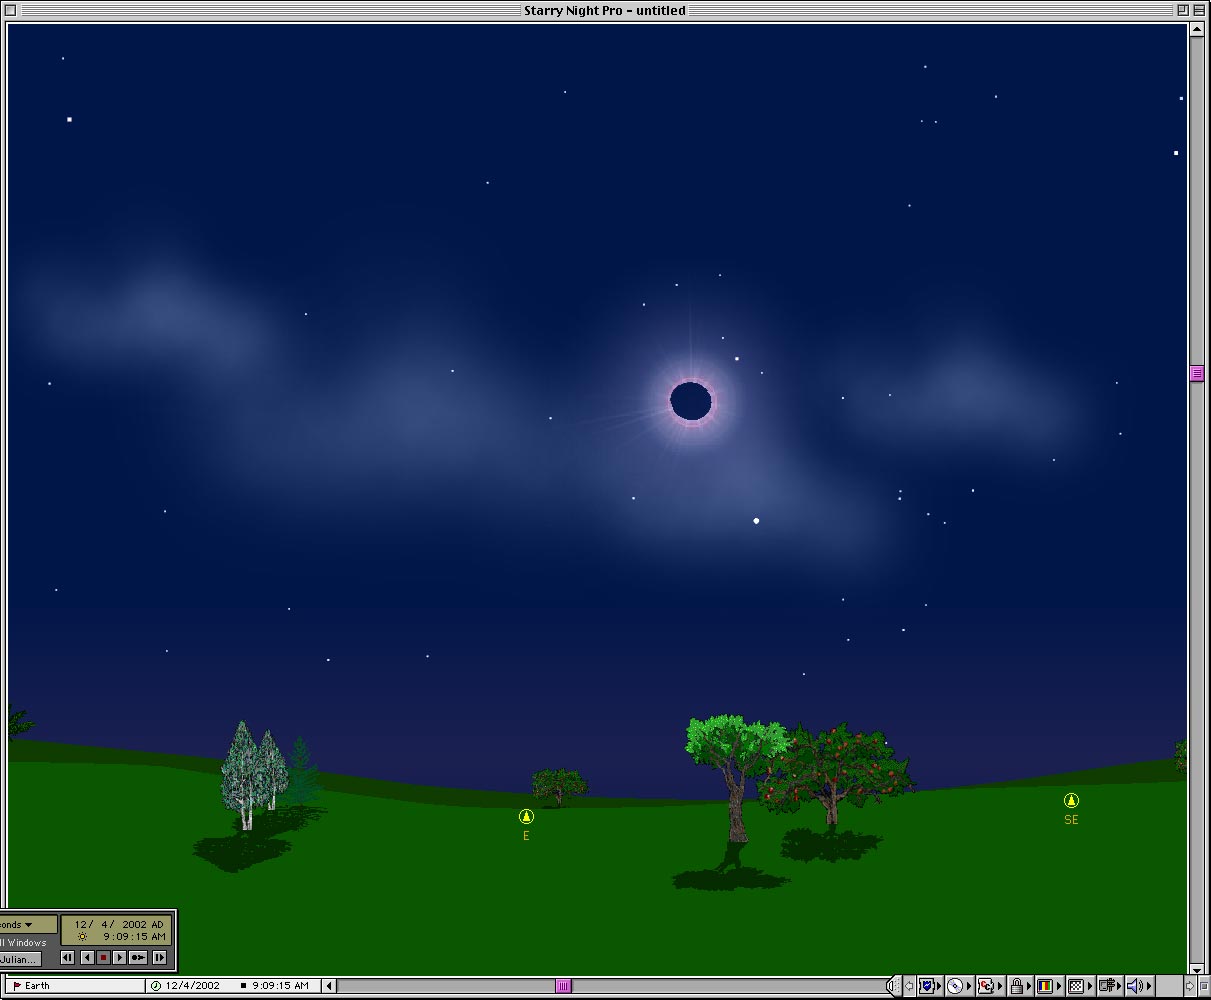
Figure 4: This shows Starry Night’s representation of a total solar eclipse (4 December 2002)
Much of Starry Night’s complexity comes about because you can make so many choices about what is shown and the way in which it is shown, and because there are two or more means of accessing most of the settings. In fact, the multitude of settings comprise a lot of the menu items, but you can leave most of them alone at first. You can choose the kinds of objects you see: planets, stars, galaxies, and even your horizon.
If you find a setting that’s really good for a special purpose (like watching eclipses on Jupiter), you can save it to make it easy to get back to.
When the pointer rests on an object, its identification pops up, so you can keep your labels simple to start with. If you want to change them, use the Sky and Guide menus, or click on the appropriate button in the Display palette; the small “i” on the left of the button gives you more detailed access to labels, etc. for that class of objects.
Starry Night prints out only sky charts for observing. You can select just the desired area, or fill the whole page, by setting File/Preferences/Printing. The printout is always of black stars on a white background. If you want to print a color picture of what you see on your monitor, use the File/Export As Imageº option to save the sky window as a JPEG or other format file.
The additional features in Starry Night Pro are primarily for serious amateursæthose who spend hours every clear night observing, or do real research. The major ones are listed below (and see Figure 1).
Starry Night Pro offers many more stars than the other versions: many catalogs are provided on the CD, and you can link to more on the Web. It also offers a longer time line, guaranteeing positional accuracy to 0.5 arcsec.
A more important feature is the ability to enhance Starry Night over the Internet: to upload data on new comets, update orbits or add new spacecraft, and (as just stated) to access additional databases, or even to create your own. You can also add new photographs, download digitized Palomar Sky Survey images, or export data into a spreadsheet. David Harris’ Journal article in the September/October 1999 issue describes the tracking of spacecraft in an earlier version of Starry Night, but his procedure is useful also for Starry Night Pro.
If you have a telescope that can be computer-controlled, you can use Starry Night to move the telescope to find a desired object, or to track an object. Meade LX 200‰ and AutoStar telescopes can be controlled “out of the box”; the documentation says it isn’t hard to write a driver for other brands. You can modify the sky window appearance by setting a “night view”, so as not to hurt the dark adaptation of your eyes, or by viewing a mirror image, to correspond to the view in your telescope eyepiece.
It takes a lot of work and knowledge to use Starry Night to study eclipses. A list of events between 1800 and 2300 is provided, but clicking the “go there” button takes you to the moon looking at earth near the start of the eclipse. You can see the shadow of the moon on the earth, and the small black spot in the middle which is the region of totality; you can let time run to see the shadow sweep over the earth. What you can’t do is get an accurate trajectory such as shown in Figure 5. However, you can find web pages with trajectories for many eclipses past and future, and set “bookmarks” in Starry Night Pro. Clicking on the bookmark will take you to the desired web page (when you’re on-line, of course).

Figure 5: The track of totality for the solar eclipse of December 2002.
Personally, I think Starry Night has gone overboard in its customization of settings. The menu items you might use frequently, such as Selection/Find… get lost in the crowd.
There are other desktop planetaria available for the Mac, as well as CDs of sky images (such as the digitized Palomar Sky Survey). I haven’t tried any of these, but I hope to find time to compare Starry Night Pro to two or three similar programs soon. (Voyager III is probably the closest contestant, from www.carina.com.) You can do comparisons for yourself: a trial version of Starry Night Backyard can be downloaded from www.starrynight.com; a list of other astronomical software can be found at, e.g. www.griffithobs.org/software.html or www.r-clarke.org.uk/astrosoft1.htm.
As for which version Starry Night to get, a list of features of each version can be found on the Starry Night website. I think the “Basic” version is too limited, but the Backyard version will probably be adequate for most people. Serious amateurs should definitely get the Pro version.
Starry Night Pro requires a PowerPC and 88 MB on disk, and System 7.5 or later. It uses 10 MB of RAM. An update for OS X has been promised for this fall. (For older Macs, with 68K CPUs, running OS 7, Starry Night Deluxe will run if you can still find it.)
Take the CD with you when you travel, especially if your friend in the hinterlands has a computer. Even if it’s a Windows PC, you can still run it from the CD, without putting anything on the borrowed machine, as long as the PC has a Pentium III.
Get it! This is a very good desktop planetarium program, at a reasonable price.